Pricing & Negotiating: Usage Extension of an Existing Lifestyle Library

Jess Dudley, Wonderful Machine

Original Shoot Concept: Real People Lifestyle Library License Extension

Licensing: 1-year extension for 48 images Web Collateral use

Photographer: Established Midwestern portrait, youth culture, and fashion specialist

Client: National For-Profit College

Here’s the quote:

When negotiating a given agreement, one is often faced with the challenge of balancing a client’s budget, their licensing requirements, and the intended use. As you no doubt have experienced, those three don’t often align. And just about as often, the client is resolute on the terms and unwilling to budge on any of those points. However when a negotiating window does open, I’ve found the limitation presenting the greatest upside on the backend is the duration, provided it’s short enough on the front end.

Certainly, there are instances when limiting the scope and image count can present a terrific opportunity for future revenue, and you should always press for limitations on those. But generally speaking, by the time we’re talking with a client, they’ve got a really good idea of how many images they need and how they plan to use them and aren’t likely to be open to limiting either. However, in spite of having a firm grasp on their intended usage, most clients can only anticipate, plan and budget for that use within a relatively short time horizon, typically a year or two. Beyond that, the additional duration they’re requesting is usually for peace of mind and not a concrete intention. This, combined with the facts that new budget is usually made available annually and the staying power of a given set of images is uncertain, clients are occasionally open to limiting the duration of use.

In 2015, I shared a post about a four-day library shoot, including unlimited use of the imagery for about 2.5 years. Just before the license was set to expire, we followed up with the client to see if they were interested in extending the usage. Unlike the initial agreement which included the license to all images, at this point the client was only interested in renewing the licensing to a subset of the library, 48 images, for just one additional year, and for Web Collateral use only.

Normally, we might have discounted the additional year along the same curve that we build out the majority of quotes (a doubling of duration yields a 50% increase in value, ie. 1year = x, 2 years = 1.5x, etc). Usually, that equation is applied on the front end when the value is less-than-certain to all parties. On the back-end, leverage shifts. Now the images are a “known quantity” and have enough value to the client to seek additional use. In this case, the approach we took was to simply prorate based on the original quote and duration, which came to $16,000 per year. Finally, we had to consider the pricing ceiling, which would be the cost to produce a new project substantial enough to generate 48 unique location-specific lifestyle images. It’s safe to say that would be considerably more costly than our re-use quote, so we weren’t in any real jeopardy of the client considering a re-shoot alternative.

Although it is becoming increasingly difficult, limiting licensing is an integral component of a sustainable commercial photography business model and can generate continual opportunities for residual income such as this. So keep pressing for limitations, on every project, and you may be able to generate these opportunities for yourself.

If you have any questions, or if you need help estimating or producing a project, please give us a call at 610.260.0200 or reach out. We’re available to help with any and all pricing and negotiating needs—from small stock sales to large ad campaigns.

Pricing & Negotiating: Lifestyle Images for a Non-Profit Organization

Craig Oppenheimer, Wonderful Machine

Concept: Images of volunteers and foundation members interacting

Location: An office and a TBD social setting in a European city

Licensing: Work-made-for-hire

Photographer: Portrait and lifestyle specialist

Client: A large US-based non-profit organization

Here is the estimate:

Creative/Licensing:

While the exact scope of the project was initially vague, the client hoped to capture images of their employees and volunteers in various scenarios over two shoot days at one of the foundation’s office locations and an additional social setting in a European city. The locations, talent, and production coordination would be the responsibility of the client, and they needed a photographer with minimal crew to capture everyone interacting.

On one hand, it seemed pretty straightforward, but on the other hand, the request came with a creative brief showing usage of the images on billboards along with a contract stating that the project would need to be on a work-made-for-hire basis (meaning, the copyright of the images would belong to the client). A handful of other non-profits I’ve encountered have required similar agreements, however, their budgets haven’t typically matched the value of such an arrangement. That being said, such organizations are typically relying on volunteers to go above and beyond in various ways, and I suppose they expect that notion to apply towards vendors for other goods/services as well.

When working on projects like this, I simply just ask what their budget might be, and in this case (after asking the same question a few different ways), I found out that they typically pay $3k-$4k plus expenses per day, regardless of the project scope. In this case, the photographer was comfortable with this considering the client and seemingly simple project scope. We priced the creative/licensing fee at 3,000 Euro per day, taking into account the currency conversion (about $3,700 USD) to be sure it would be palatable. There are two ways to create an estimate when currency conversion is necessary. One would have been to price the estimate in the currency of the client, which could make things progress smoothly internally, and could perhaps be more palatable. The other is to price the project in the currency of the local photographer, which is what we did here, and this ensures that the photographer receives exactly the anticipated amount of money estimated, regardless of the conversion rate at the time of payment.

Photographer Scout/Pre-Production Day(s): We included one day prior to the shoot for the photographer to scout the locations.

Assistants: We included a first assistant who would double as a digital tech, as well as a second assistant to help with equipment and lighting on both shoot days.

Hair/Makeup Stylist: While the client would provide any necessary wardrobe and/or prop styling, they requested for us to include a hair/makeup stylist to handle some light grooming on both days.

Equipment: This covered 800 euro/day for the photographer’s own gear, and any minor pieces of equipment he may need to rent.

Mileage, Parking, Meals for Crew, Misc.: I included 150 euro each day, anticipating a light lunch for 4 people and miscellaneous funds for parking and misc. expenses each day.

Delivery of All RAW Content on Hard Drive: The client planned to handle all of the post-processing, and simply wanted all of the images provided to them on a hard drive. This including the cost of the hard drive and international expedited shipping.

Feedback: Despite a seemingly clear conversation about their budget initially, we were told that our estimate was a bit too high for them. We discussed a few items that we could adjust to bring the expenses down while keeping the creative/licensing fee intact. We dropped the scout/prep day by 150 euro, removed the second assistant, reduced the equipment to 1k and cut the misc. expenses in half. Additionally, the client said they could provide a hard drive and cover shipping costs, so we removed that expense. Those changes helped us get just under 10k euro, which we thought should do the trick. Here was the estimate:

Results: The photographer was awarded the project, and we began talking about another project in a different city as well.

If you have any questions, or if you need help estimating or producing a project, please give us a call at 610.260.0200 or reach out. We’re available to help with any and all pricing and negotiating needs—from small stock sales to large ad campaigns.

Expert Advice: Self-Assigned Projects

Mellisa Pascale, Wonderful Machine

Here at Wonderful Machine, we prefer the term “self-assigned” rather than “personal” to describe the projects that photographers create themselves. After all, these types of ventures are more than side projects that satisfy extraneous creative visions; they also serve to demonstrate a photographer’s proficiency with a genre he or she would like to shoot more of. To put it simply, shooting what you love can, with the right presentation, lead to assignments that you love.

Pursuing self-assigned work allows you to create imagery that’s geared towards a specific target industry or client. Take, for example, Felix Reed’s Mont Blanc project, which served a dual purpose fulfilling both a life-long dream and a portfolio piece. Having always wanted to scale Europe’s highest peak, the Bologna, Italy-based photographer folded some adventure imagery into his expedition. Felix integrates the photos into the Lifestyle galleries on his website and opens his homepage with a slideshow of images, the first of which is from Mont Blanc.

Expert Advice, Self-Assigned Projects, Personal Projects, Photographer, Photography, Wonderful Machine, Felix Reed, Mont Blanc, Bologna, Italy, Adventure, Adventure Photography

Read more about this project here.

Showcasing your self-assigned projects right alongside your client-based work, rather than separating it out as “personal,” gives the photos an opportunity to shine. Just because you had to rely on your own resources to create the images doesn’t mean they’re less telling of your abilities as a photographer.

If anything, calling on your own resources to produce a shoot should make you more appealing to potential clients. In addition to rounding out your portfolio, self-assigned projects also exhibit a photographer’s ability to project manage. When Falmouth, England-based Olivia Bossert wanted to garner more fashion assignments, she started with a fashion self-assignment. Casting a model, sourcing a stylist, and enlisting a small videography team for an added element, Olivia took her team to a picturesque English bluff to capture these stylish images.

Expert Advice, Self-Assigned Projects, Personal Projects, Photographer, Photography, Wonderful Machine, Olivia Bossert, Falmouth, England, Fashion, Fashion Photography

Read more about this project here.

Ultimately, your skills as both a photographer and a collaborator demonstrated in a self-assigned project can lead to something more. Noah Willman, a photographer operating out of Washington, DC, reached out to the Alexandria Boxing Club, aiming to build up a sports and fitness repertoire. After photographing the boxers and trainers in action and behind the scenes, capturing the community vibe, Noah pitched his photo series to various editorial clients. In addition to licensing his images to several publications, including Washingtonian, Noah also continues to cover the club’s events and other goings-on.

Read more about this project here.

Documentary photographer Nicole Franco conceptualized a fine art project, titled Charros, capturing Mexico’s traditional horse-riding competition, Charreada. Her emotive black and white images earned Nicole her first solo exhibit, to be on display in Bellas Artes in the summer of 2018.

Expert Advice, Self-Assigned Projects, Personal Projects, Photographer, Photography, Wonderful Machine, Nicole Franco, Charros, Bella Artes, Fine Art, Fine Art Photography, Mexico City, Mexico

Read more about this project here.

Nicole’s success demonstrates another integral aspect of self-assignments. Diving into your personal interests via photography demonstrates initiative and self-sufficiency, not to mention your love for the medium.

“Like all creatives, there are times when we feel the need to challenge ourselves. I had a very clear vision about a new project I wanted to shoot.…I’ve been riding since I was a child and my relationship with horses has been and continues to be tremendous in my life, so photographing them was natural to me.” – Nicole Franco

It can be quite challenging to tackle something so close to your heart, but with patience and calculated execution, your self-assigned passion project can reap rewards. Over the course of 25 years, Los Angeles based photographer Manuello Paganelli captured his travels to Cuba, exploring his heritage as well as the country’s anatomy. This ongoing project resulted in a book, Cuba: A Personal Journey 1989-2016.

Expert Advice, Self-Assigned Projects, Personal Projects, Photographer, Photography, Wonderful Machine, Manuello Paganelli, Cuba, Cuba: A Personal Journey 1989-2016, Fine Art, Fine Art Photography, Los Angeles, California

Read more about this project here.

Never underestimate the power of self-assigned projects. Integrating work into your portfolio that’s conceptualized and executed by you is one terrific way to expand your photography business into new ventures.

Looking to get started? Reach out to our consultants – we’d love to help!

Pricing & Negotiating: Portraits for Web Collateral and Digital Billboards

Craig Oppenheimer, Wonderful Machine

Concept: Portraits of sales reps against a seamless background at a sales conference

Licensing: Web Collateral use of all images captured in perpetuity

Photographer: Lifestyle specialist based in the Southern U.S.

Client: A national health and wellness brand

Here is the estimate:

Creative/Licensing: While the photographer primarily shoots lifestyle assignments, he had a relationship with this brand from earlier in his career, and they approached him for a seemingly straightforward portraiture project. The company had a large roster of sales reps around the country who would be attending a four-day sales conference, and they hoped to capture individual portraits of as many attendees as possible. We were told that they were unsure of how many attendees would need to be photographed, but that it could be around 50 people each day. While that initially sounded ambitious, it became clear that they were anticipating a yearbook-style approach, spending just a few minutes with each person who would arrive camera-ready.

Since they couldn’t dial in a number of final shots they hoped to license, and because they planned to handle all of the post-processing internally, they requested to include usage of all images captured. Also, they initially planned to use the photos only on the brand’s website and in emailers to clients. From this information, initially, I felt that $100/person would be a good starting point, which based on approximately 50 people per day over four days brought me to $20,000. Based on my conversations with the client, I knew $20,000 would likely eat up their entire budget, so in order to make room for the expenses, I backed the fee down to $16,000. This broke down to $4,000/day, and it seemed in line with the nature of the project and the value of the images for the requested usage.

Assistant and Digital Tech: While the lighting setup would be simple and remain the same each day, we included an assistant to help set up/breakdown each day and monitor the lights. Additionally, while the client wouldn’t necessarily be present for each portrait, we knew that the consultants would want to review the images as they were captured, so we included a digital tech for each day as well, and they’d be working off of the photographer’s laptop.

Equipment: The photographer would likely rent a backup camera body (approx. $150/day) and backup lenses ($50/day) for each day, and the remainder of this expense would be put to covering the photographers own grip/lighting and primary gear.

Mileage, Parking, Meals, Misc.: I included $30/person/day for lunch, plus $50/day for miscellaneous expenses like parking and/or mileage, and then rounded down just a bit.

Delivery of RAW Files on Hard Drive: Since the client would be handling all of the post-processing, and because they wanted all of the images captured, it was easiest to have the digital tech transfer all of the images to a hard drive and hand it over at the end of the last day of shooting.

Results: The photographer was awarded the project, and about a month later, the client informed the photographer that they planned to use the images for a digital billboard in New York City’s Times Square, and wanted to know the cost to expand the licensing. After speaking with the client, we learned that they hoped to use just 10 of the portraits for an animated mosaic within a large digital billboard for four weeks. On the one hand, a billboard in Times Square is undoubtedly a prominent (and likely expensive) media buy, but on the other hand, the use would be limited to just a few weeks, and the ten photographs would be used to composite a single larger image. I ended up pricing this at $7,500, which is comparable to how I might typically assess the value of one image for one year of unlimited use for a large brand. Given the client and the media buy (and the fact that it broke down to $750/image when viewed that way), I felt that this was appropriate.

The client approved the $7,500 for the licensing, and it was just a few months later when they reached out again for yet another shoot. The specs were the same as the original assignment (they were planning another conference), except they hoped to just wrap up both the web collateral use and digital billboard use for a single fee. Adding the two previous creative/licensing fees together gave us a figure of $23,500. Given the quick approval of the previous fees, we believed that we could push a little higher, so we rounded up just a bit to an even $25,000 plus expenses. The client approved this fee as well.

If you have any questions, or if you need help estimating or producing a project, please give us a call at 610.260.0200 or reach out. We’re available to help with any and all pricing and negotiating needs—from small stock sales to large ad campaigns.

Pricing & Negotiating: Exterior and Aerial Architectural Images for Oil Company

Craig Oppenheimer, Wonderful Machine

Concept: Exterior and aerial architectural photography of an oil refinery.

Licensing: Public display of 15 images in a corporate office.

Photographer: Architectural and landscape specialist.

Client: Large oil and gas company.

Here is the estimate:

pricing & negotiating, craig oppenheimer, exterior and aerial photography, oil refinery, architectural photography, industrial photography, estimating, shoot production

Creative/Licensing: The photographer had a longstanding relationship with an architectural firm who was working with the client to develop new office spaces, and they connected the photographer directly to the client to discuss the creation of artwork to fill the new space. They hoped to capture images of their oil refinery both from the ground and from above to showcase the scale of their complex in an artistic way. They were interested in 15 images, and after speaking with the photographer about different angles/shots, they anticipated needing two shoot days to accomplish the project. Based on conversations with the client, they intended to make use of the images in various ways, ranging from a large-scale display in the lobby to smaller-sized prints throughout the office.

Since a few of the images were going to be more prominently displayed than others, I developed a tiered pricing model starting at $2,500 for the first image, $1,000 each for images #2-4, $500 each for images #5-8, and $250 each for images #9-15. That brought me to $9,250, which I initially doubled considering the potential shelf life of the images. When pro-rated, that brought me close to $1,250/image, which I felt was a bit high, so I brought down to $1,000/image and an even $15,000 (breaking down to $7,500/day when viewed that way). Given the size of the client, it felt a bit light, but with expenses bringing our bottom line up near $25k, I felt this was appropriate based on other similar projects I’ve estimated.

Photographer Scout Day: Before shooting, the photographer would do a walkthrough of the location to determine the best angles and time of day to capture each shot.

Helicopter Rental: The photographer had previously rented helicopters for projects, and anticipated paying $450 per hour. Based on where the helicopter would take off/land, and the few shots that were needed, we included 2 hours and rounded up just a bit. Sometimes chartering a helicopter for this purpose requires the rental of special safety or stabilization equipment, however, it was not required in this instance.

Equipment: This included the photographer’s camera, backup body, and specialty lenses for two days.

Mileage, Parking, Meals, Misc.: I included $50/day for meals and $100/day for mileage and miscellaneous expenses that might arise.

Shoot Processing for Client Review: This included the photographer’s time to transfer all of the images from the cards to his computer, review and batch color-correct the content, and prepare a web gallery for the client to choose from.

Retouching: I included two hours of retouching, based on a rate of $150/hour, for each of the 15 images.

Results: The photographer was awarded the project.

Hindsight: Considering the size of the client and the lack of negotiation, I think we could have aimed higher on the creative/licensing fees. It can actually be reassuring when a bit of resistance is met, which lets me know when we’re at the top threshold of a budget range, but since there wasn’t any pushback, there may have been some room to charge more initially. That being said, considering the market and the limited usage, I still feel the fees were appropriate.

If you have any questions, or if you need help estimating or producing a project, please give us a call at 610.260.0200 or reach out. We’re available to help with any and all pricing and negotiating needs—from small stock sales to large ad campaigns.

Pricing & Negotiating: Vehicle Owner Portraits for Automotive Brand

Craig Oppenheimer, Wonderful Machine

Concept: Portraits of multiple vehicle owners, as well as images of the vehicles by themselves, each in unique locations.

Licensing: Unlimited use of all images captured in perpetuity.

Photographer: Portrait and lifestyle specialist

Agency: Medium in size, based in the Northeast

Client: Large automotive brand

Here are the estimates:

pricing and negotiating, wonderful machine, estimates for shoot production, shoot production estimates, executive producers who do estimates, estimates for photographers, wonderful machine production company, examples of photographer contracts, Craig Oppenheimer, executive producer pricing and negotiating, wonderful machine, estimates for shoot production, shoot production estimates, executive producers who do estimates, estimates for photographers, wonderful machine production company, examples of photographer contracts, Craig Oppenheimer, executive producer

Creative/Licensing: The automotive brand had a well-established group of brand ambassadors across the country that they planned to photograph with their cars. The agency hoped to capture at least six of them that were local to the photographer, with the possibility of photographing two more in a location that would require a bit of travel. Each subject would be photographed at their home and/or garage, and with a limited production approach, the agency anticipated that the photographer would be able to capture three subjects per day. Given the potential additional subjects and travel, they asked for two estimates (one for the local shoots, and another for the shoots requiring a bit of travel).

There was a very large discrepancy between the unlimited use they were requesting and their intended use which was primarily social media focused, with the possibility of placement within some collateral pieces. While I always push to limit the licensing in some way, the agency told us it was non-negotiable. Unfortunately, this is often the case for very large brands, even on projects focusing on non-campaign oriented imagery. In these instances, I do my best to determine a creative/licensing fee that’s appropriate for the client’s intended use. For this project, each subject would likely have two types of shots: a portrait of them with their car and a picture of the car alone. I priced the first image at $2,000 and the second image at $1,000, totaling $3,000 for each subject. In some instances, I’d be inclined to develop a tiered pricing model and discount additional images (or in this case subjects), but since each set of images would be unique, I felt their value was equal, so I stuck with $3,000 per subject across the board for a total of $18k and $24k for each project.

Pre-Production and Travel Days: I included a prep day in each estimate to account for the photographer’s time to plan all of the shoots and correspond with each subject. For the estimate with 8 subjects that would require travel, I included two travel days for the photographer to get there and back, before and after the shoot day.

Assistant: I included one assistant on each shoot day, and added travel days for the assistant to accompany the photographer on the trip to capture the additional subjects as well. Since the client wouldn’t be attending the shoot, a digital tech wasn’t critical, and since the people/cars would be captured in an editorial style, there wasn’t a need for any additional crew to help with excess grip/lighting.

Equipment: I included $500/day to cover the photographer’s personal equipment, which included a camera with a backup, a few lenses, and minor lighting gear.

Mileage, Parking, Meals for Crew, Misc: For the local shoots, I included $100/day to cover mileage and parking, plus $100 to cover meals and other miscellaneous expenses over the two shoot days. For the estimate that required travel, I added another $60 per person per day for meals while they would be traveling for three days ($360), plus approximately $400 to cover mileage, parking, and miscellaneous expenses while they were on the road.

Lodging: On the estimate that included travel, I estimated $200/night for two nights, with rooms for both the photographer and his assistant.

Delivery of All Images on Hard Drive: The agency planned to handle all of the retouching, and simply wanted all of the images to be sent to them on a hard drive at the completion of the shoot. This fee covered the cost of the drive and priority shipping.

Results: Based on subject availability, the agency was unable to coordinate the project with the vehicle owners out of town, but they were still interested in capturing the subjects local to the photographer. The agency let us know they had a $20,000 budget to accomplish this and asked us what we could do to reduce costs. While I’d typically suggest limiting the licensing in some way to provide a discount, given the small amount we had to shave, the photographer was willing to take $1,000 off his fee, waive his equipment expenses, and bring the miscellaneous expense line down a bit to hit $19,500. He was awarded the project. Here was the final estimate:

pricing and negotiating, wonderful machine, estimates for shoot production, shoot production estimates, executive producers who do estimates, estimates for photographers, wonderful machine production company, examples of photographer contracts, Craig Oppenheimer, executive producer

If you have any questions, or if you need help estimating or producing a project, please give us a call at (610) 260-0200. We’re available to help with any and all pricing and negotiating needs—from small stock sales to large ad campaigns.

Pricing & Negotiating: Employee Portraits for a Sustainability Report

Jess Dudley, Wonderful Machine

Shoot Concept: Employee Portraits

Licensing: Collateral Use in a Sustainability Report

Location: Client Offices in the Northeast

Shoot Days: One

Photographer: Northeast-based portrait and lifestyle specialist

Agency: Mid-Size, West-Coast Based

Client: A Large Consumer Brand

Here is the estimate:
pricing and negotiating, wonderful machine, estimates for shoot production, shoot production estimates, executive producers who do estimates, estimates for photographers, wonderful machine production company, examples of photographer contracts, Jess Dudley, executive producer

Creative/Licensing:  
I recently worked with a photographer to estimate a small corporate portrait shoot. The client wanted individual portraits of three of their employees and one group shot of all three together. All four shots would be captured against the same seamless background. The requested usage was limited — the licensing would be restricted for use in the client’s 2017 corporate sustainability report (generally speaking, a sustainability report’s audience is limited to investors, employees and internal stakeholders). With such limited usage rights and only a handful of images, the value of the licensing was going to have a relatively low ceiling, even for this recognizable consumer brand. I set the value of the first individual portrait at 1000.00 and each subsequent individual portrait at 500.00. Since the group portrait could stand alone, I valued it at the same rate as the first individual shot: 1000.00. This brought us to a total fee of 3000.00.

The client also requested a usage option to expand the licensing to include concurrent web collateral use. Again, we determined the value of the first individual portrait and the group shot at the same amount: 500.00 apiece. We set the additional individual portraits at 250.00 each, for a total expansion option of 1500.00 for all four images. I made sure to note that the option was for “concurrent” use to avoid any liberal interpretation of the duration windows.

Considering the limitation on the print collateral usage, these were pretty healthy fees for three reasons: First, the client was a large consumer brand, with lots of investors and interested parties eager to see the sustainability report. Second, their agency was eager to work with a photographer who wasn’t local to the client, in spite of the concept being straightforward and the local market being flush with comparable shooters. Lastly, the photographer had worked with the agency before, meaning that we had a bit of leeway to push for healthier fees, knowing that the agency would almost certainly come back to us with the opportunity to revise if the budget became a concern.

Client Provisions: I listed all of the important production elements the client and agency had agreed to provide, including the shooting location, camera ready subjects, post-processing, etc.

Tech/Scout and Travel Days: The photographer was based about 3-4 hours from the client’s offices and wanted to walk through the location in advance of the shoot to ensure she had enough space to set up the seamless and lighting for the group shot. We included one travel/tech day to cover the travel and scouting beforehand. Since the photographer wasn’t interested in driving back the evening the shoot wrapped, we included a travel day to cover her return time afterward.

Assistants: This was a pretty basic setup, so the photographer only needed one assistant, which she was comfortable hiring locally.

Equipment: The equipment covered the basic seamless backdrop, lighting, and the camera/grip equipment the photographer would need to rent in order to create the full-length seamless portraits.

Shoot Processing for Client Review: The photographer would be batch processing all the images from the shoot and delivering a gallery from which the client could make the final selects. This line item included the photographer’s time to manage that process.

Selects Processed for Reproduction: The client intended to provide all the basic post-processing and any necessary retouching but requested an optional cost for the photographer to handle the basic post work just in case they bit off more than they could chew. We priced the optional post work at 125.00 per image.

Car Rental, Lodging, and Misc.: The photographer would need to rent a car to get to the location, so we included the cost of the rental and gas for three days. She would also need lodging near the location for two nights, and we included estimate costs for tolls and meals.

Styling: Finally, we included an option to add a groomer to manage basic HMU and Wardrobe styling throughout the shoot, should the client decide to spring for the extra support. On a shoot like this, a stylist would be very beneficial but generally isn’t abosultely necessary.

Results/Hindsight: The photographer was awarded the job, but due to shifting schedules, was unable to take the project on.

If you have any questions, or if you need help estimating or producing a project, please give us a call at (610) 260-0200. We’re available to help with any and all pricing and negotiating needs—from small stock sales to large ad campaigns.

Expert Advice: Twitter for Photographers

Alyssa Shand-Perreault, Wonderful Machine

Social media is an important part of self-promotion and marketing for any business, large or small. And having a wide variety of social media tools at your disposal is important. While it’s true that you can link all your social media accounts together so you can conveniently create one post that will appear on all your accounts, each platform is unique. Twitter, specifically, might be stereotyped as just a funny, witty place to spew out 140 characters of charm, but it has features that distinguish it from its competitors and can help you build your brand and implement your business strategies. For photographers, the short and sweet style of Twitter can help you effortlessly get your photos out there.

TWITTER FUNDAMENTALS

Once you’ve decided to join Twitter and set up an account for your photography business, there are a few crucial steps you should take. Keeping in mind that Twitter and other social media platforms are an extension of your brand, make sure your profile reflects how you identify yourself in your portfolio, on your website, and in person.

Theme Color: The theme color you set on your Twitter profile should match your brand identity that you use on your business cards, stationery, website, etc.

Profile & Cover Images: The images you use for your account should show who you are and the type of work you do. For the profile picture, use a professional headshot or your logo. The cover photo should be an example of your strongest work and lure viewers to stay on your profile and look around. As you integrate new photos in your portfolio, you can refresh your cover image to keep your profile interesting and be reflective of your recent work.

Bio: Keep the bio on your profile concise, to match Twitter’s style. This can be a trimmed down version of the one on your website, or you can write a new one that shows a little more personality. Either way, you should customize your bio for the type of profile you want to have on Twitter. If you want your account to show off who you are and what people can expect when they work with you, keep it light, humorous, and full of personality. If you want to use Twitter as an extension of your portfolio and keep it strictly about the imagery, then make your bio more professional and simple.

“Agency Producers are the new Art Buyers and are who you want to connect with via social channels such as Twitter … Use Twitter to let your work and personality breathe, this is why agencies hire you.”

– Ryan Hill, 8183 Studio

Expert Advice, Twitter, 8183 Studio, Wonderful Machine
8183 Studio‘s Twitter Account is a great example of how you can let your Twitter be representative of your brand and really show off your work! 

TWEETING 101

With only 140 characters of text, you have to be concise. Twitter has made some updates so that URLs account for fewer characters than they did in the past, which makes it easier to convey your message. But, don’t forget to leave some space in your tweet for relevant hashtags!

Hashtags

Using hashtags is a great way to attract viewers to your profile, and ultimately to your website. Here are three rules to keep in mind when adding hashtags to your posts:

  1. Don’t Over-Hashtag  As a rule, when adding hashtags, less is more. Since they count in the 140-character limit on Twitter, you don’t want to cut out some of your meaningful content to add more hashtags. If you’re showing off a new photo, you want there to be a caption that details the project, not just a bunch of hashtags.
  2. Remember your SEO Hashtagging is crucial for your posts’ SEO, though. It’s a good way of including a bunch of keywords that might not fit so smoothly into your caption. Be aware of what’s trending (we’ll get into that later) and be aware of what’s working for you already!
  3. Make sure they’re relevant to your contentWhen adding a hashtag, it’s tempting to just throw in random popular trending hashtags that have nothing to do with your post just to draw maximum viewers. This is a mistake. You want to make sure that the hashtag you’re including has something to do with you, your photography, or your content. Other users can report your content if they feel that you are wrongly using hashtags as self-promotion and eventually your account can be blocked, so maintain ethical hashtag practices!

FOLLOWING OTHER PEOPLE

If you’re using Twitter for personal reasons, then feel free to follow whoever you want and retweet anything you find relevant or humorous. But it’s important to keep those practices separate from your professional Twitter account. Similarly to other social media accounts, who you follow can have a huge impact on your own following and on your reputation on Twitter. You want to make sure you’re following people or companies that you’ve worked with, have a connection with, those you admire, those whose content you enjoy viewing, and those you hope to work with in the future. Think of this as a networking tool – the minute you follow someone, they’re inclined to come look at your profile and if you’re in the same industry, they’ll likely follow you back.

Keep in mind that there are limitations on the number of users Twitter allows you to follow. Once you reach 5000, you get cut off and then have to go through the painful process of weeding out your list. It’s much easier to make sure you’re following the most relevant accounts first!

PINNING TWEETS

If you recently worked on a big project and you want to give it a larger amount of exposure, you can post a tweet and then pin it to your profile. Pinning a tweet means that it will stay at the top of your profile, even as you add new tweets. This can be a great tool to showcase a particular project, while still tweeting daily to maintain your following and attract new viewers.

Expert Advice, Twitter, Dom Romney, Wonderful Machine
Example of a pinned tweet on Dom Romney’s Twitter

USING YOUR LIKES WISELY

Whenever you “like” another tweet, it gets saved on your profile under a tab called Likes. Think of likes as more than just literally enjoying a tweet, but rather a way of “saving” important information you might want to refer to later. There are two main ways you should be thinking of Likes.

Likes are public, so make sure you’re careful about how you use this feature. You should like things that are relevant to your brand, tweets written by people that you want to follow you, important news. Because this is visible on your profile, you want to make sure you’re not liking everything under the sun, and that you utilize this function as a continuation of your brand.

You can also use likes as a way of building a reference list. Like tweets that are written by potential prospects, feature an upcoming project you want to take part in, or showcase creative ideas you might want to call on in the future. You should definitely like any positive tweets that someone has written about you. That way, you can both demonstrate your appreciation for the kind words and also keep track of favorable engagement.

USING IMAGES ON TWITTER

While Twitter hasn’t always been the most photo friendly, recent changes to the platform have made it easier to showcase your images. In the past, pictures took up a portion of the word count allotted, and at 140 characters, that was pretty detrimental. Images in Twitter were also previously cropped so they could fit comfortably in the feed, and you could only share one at a time. Oftentimes, photographers will link their Instagram to their Twitter and share pictures that way. The problem with this approach is that the viewer doesn’t see the image, just a URL and hashtags. It would be better to share any images directly on Twitter, as a Hubspot survey showed that:

Expert Advice, Twitter, Wonderful Machine

2016 HubSpot blog post also talks about some of the ways Twitter has updated its platform to better accommodate images. Here are a few ways Twitter has improved to better serve photographers who want to include photos in their tweets:

  • Adding images no longer takes up characters.
  • The image size requirements have changed so they won’t be as cropped as they used to be.
  • A new viewing option was added where you can add multiple photos in one Tweet. The first image you add will be the dominant image and the rest will be visible in thumbnail view. When you click on the image, you’ll be able to toggle through all the images in full-size. This is great for photographers who want to showcase a few images from a shoot or project they recently worked on.

Expert Advice, Twitter, Timothy Hogan, Morgan Lockyer, Wonderful Machine

Mercieca tweets about a Timothy Hogan and Morgan Lockyer shoot for Winsor and Newton, featuring three images from the campaign.

MAXIMIZING YOUR TWITTER POTENTIAL

Once you’re comfortable with Twitter, there are a few steps you can take to make the most out of your account.

Lists

Lists are an organizational tool on Twitter where you can neatly categorize who you’re following by subject, organization, etc. More importantly for photographers, you can create lists for Brands, Agencies, and Publications. Then you can add people/groups/organizations into these lists as appropriate. This is useful for keeping track of the kinds of tweets these prospects post, retweet, and like, making it easier for you to track what they’re focusing on and tailor your tweets accordingly.

You can also use lists to follow other photographers that shoot the same specialties as you in order to keep tabs on the competition. You can use lists for people that inspire you. You can build a list of people you’ve worked with in the past and stay up-to-date on their activities. Essentially, there’s no limit to who you put in a list and what the list is about.

Lists do default to public, so everyone can see what lists you have created and who is included in them, but you do have the option to make them private (which might be a good idea for your prospective client lists). When you add someone to a public list, they will get notified and likewise, if someone adds you to their list you will also get notified. This is a great feature because you can see how you’re being categorized and you can make connections with the people that have added you to their lists.

It’s also not a terrible idea to look at the lists your prospective clients, competitors, or peers have created so you can see what types of topics/people they’re interested in following.

Certain lists already exist and it will be easier for you to subscribe to an existing list rather than create a new one. For example, if you’re interested in seeing all the content posted by National Geographic photographers, you can subscribe to their list and keep track that way.

Expert Advice, Twitter, Nat Geo Photographers List, Wonderful Machine

Nat Geo Photographers List

Trends

On Twitter’s homepage, you’ll see a Trends menu. This menu includes the top 10 topics and hashtags that are popular that day. Keep in mind that trends are tailored for you, based on who you follow and your location. Trends is a terrific tool to use when coming up with a new Tweet because you know that hashtag has a substantial following. So, as an example, if you see that #MemorialDayWeekend is trending, it’s probably a good time to post a Memorial Day related image and use that hashtag. That way, people who are searching for tweets with that hashtag will find you and your photo. Trends are ever-changing, so it’s a good idea to keep on top of this. And be sure not to force anything; you want viewers, but more importantly, you want to be re-tweeted, you want relevant likes, and you want to retain followers.

“Posting from Instagram just adds a link to your Tweet so I prefer to post pictures directly onto Twitter with a quick caption featuring prominent hashtags that are currently trending, such as Oscar winners or Harrison Ford crashing a plane … Again.”

– Robert Gallagher

Expert Advice, Twitter, Robert Gallagher, Wonderful Machine

An example of a trends-based tweet for March Madness by photographer Robert Gallagher.

Twitter Analytics

Twitter Analytics is a free tool that allows you to see Tweet Impressions, Profile Visits, and Follower trends easily over time. You can also view the top tweet and top mention for each month. This tool is useful for tracking followers gained and lost, seeing if your tweets are making an impression, and taking note of which ones really stood out. That way, you can learn how to improve over time.

Expert Advice, Twitter Analytics, Wonderful Machine

Sample Analytics Monthly Summary from Wonderful Machine’s Account

Twitter also offers Twitter Flight School, which is a free course that helps you understand all of the features at your disposal. It’ll help you study Twitter Analytics to make sure you’re getting the most out of your account, and guide you in your quest to conquer the Twitterverse!

Please feel free to get in touch with me if you have any questions or suggestions. If you want help managing your social media accounts, you can get in touch with our Senior Marketing Consultants.

Expert Advice: Wireless Tethering with CamRanger

Alex Subers, Wonderful Machine

Tethering can be quite the nuisance. Limited mobility, minimal space on set, crashing laptops, and fickle cables to name a couple of reasons why.  Now depending on the scale of the shoot, tethering with cables and a digital tech station is necessary. But what about those shoots that don’t have the budget, space, or time to allow for an on-site digital tech and station? That’s where the CamRanger comes into play. It takes all of 2 minutes to connect to your iPhone, iPad, and camera, and but will save you hours on every shoot.

Alex Subers, Expert Advice, Tethering with CamRanger, Wonderful Machine, Photography, Photographer, How to tether using CamRanger, Best CamRanger Strategies, Professional CamRanger Advice, Expert Advice on Using CamRanger, Wonderful Machine Expert Advice

What does it do?

The CamRanger can work in multiple capacities:

  • Remote Shutter Release/Camera Adjustments
  • Wireless Downloading of Images (great for pumping out real-time social media posts)
  • Live View
  • Time Lapse/Bracketing

Alex Subers, Expert Advice, Tethering with CamRanger, Wonderful Machine, Photography, Photographer, How to tether using CamRanger, Best CamRanger Strategies, Professional CamRanger Advice, Expert Advice on Using CamRanger, Wonderful Machine Expert Advice
Remote Shutter Release/Camera Adjustments

After linking the CamRanger with your phone or tablet, you will be able to wirelessly trigger your shutter straight from the app, along with being able to control the majority of the camera settings you need while shooting, such as exposure, aperture, ISO, white balance, etc. The main benefit of this comes when you’re shooting photos that prohibit you from touching the camera, such as low shutter speeds, multiple exposures, or cameras out of reach (architecture, time lapses/long exposures, and any other photos requiring compositing).

Wireless Downloading of Images

This is the feature I tend to use the most due to the timely nature of the images I’m shooting. When I’m shooting games for the Sixers, getting the team photos throughout the game for their social media platforms is extremely important. One of the challenges has always been trying to beat out the competition, Getty Images. Since Getty photographers have a proprietary wireless software built-in to their cameras, they can get photos out real time. The CamRanger has leveled the playing field by creating a wireless network between the device and your phone, giving you the capability of browsing through your CF card straight from your phone and downloading high res images right on the spot. Although it’s not quite as quick as the Getty software, it’s 100x faster than walking to the press room after every quarter and uploading/exporting images. Here are a couple of popular photos I’ve been able to deliver real time.

Alex Subers, Expert Advice, Tethering with CamRanger, Wonderful Machine, Photography, Photographer, How to tether using CamRanger, Best CamRanger Strategies, Professional CamRanger Advice, Expert Advice on Using CamRanger, Wonderful Machine Expert Advice

Alex Subers, Expert Advice, Tethering with CamRanger, Wonderful Machine, Photography, Photographer, How to tether using CamRanger, Best CamRanger Strategies, Professional CamRanger Advice, Expert Advice on Using CamRanger, Wonderful Machine Expert Advice

Live View/Time Lapse/Bracketing 

These features are pretty straightforward. The live view capability is beneficial when the camera is out of reach, such as, in high or overhead angles, when you need to adjust the placement of items within the shot (particularly useful in food and still life shoots). The time-lapse feature is essentially a built-in intervalometer, allowing you to choose how many frames you want to shoot with how much time in-between. The bracketing feature, as you can see in the image to the right, allows you to set your initial shutter speed, the size of the incremental bracketing steps, and how many shots you want to take.

Here is an architectural photo that I used the CamRanger for when bracketing and triggering the shutter.

Alex Subers, Expert Advice, Tethering with CamRanger, Wonderful Machine, Photography, Photographer, How to tether using CamRanger, Best CamRanger Strategies, Professional CamRanger Advice, Expert Advice on Using CamRanger, Wonderful Machine Expert Advice

It wasn’t an ideal environment, but as you can see, I was able to change exposures straight from my phone, without having to touch the camera, making the post-processing a breeze to piece together.

The CamRanger is essentially a $300 investment that turns your phone/tablet into a portable digital tech station time and time again, without fail. In my opinion, this product is a MUST in any photographers camera bag. Check out the CamRanger website here, and feel free to reach out if you have any questions!

Expert Advice: Hiring Crew for Photo Shoots

Julia Hanley, Wonderful Machine

Here at Wonderful Machine, we pride ourselves on being experts on all things photography and production. When working on a big shoot, one of the first steps towards a successful outcome (right after you’ve been awarded the project) is sourcing and booking a solid crew. How does one accomplish this seemingly insurmountable task you may wonder? Let us be your guide!

As a photographer, your crew is a group of hand-selected individuals who will help you with aspects of your shoot you cannot do yourself. Your crew can range anywhere from one to more than twenty people.

There’s no secret formula for sourcing the perfect crew, but you do need access to the right information and resources to get the ball rolling. Your approach to sourcing the perfect crew will vary based on the individual project you’re producing, but it should always include these steps:

BUDGETING

Before you get started, figuring out how you want to distribute your budget is key. Even though the budget can be restricting, you’ll want to be sensitive to not sacrifice the creative in any way. This should all be discussed during negotiations. Depending on the size of the project and the resources you have available, you’ll have to decide the size of your crew as well as if you want to hire people that specialize in certain areas or a couple of folks who can handle multiple tasks. For instance, you could find a stylist who can take care of both hair and makeup, but if the production is large and you have the budget for it, you might need specialists for each. Location can also play a big part in determining crew size. For example, if you’re shooting outside in multiple locations throughout the day, you may want to opt for a smaller footprint production versus when shooting in a studio. Other variables to consider are cancellation policies, insurance, and markups. Some crew will charge if you don’t cancel within a certain window, so be aware of that possibility given weather disruptions and other potential interferences. Insurance is vital, too. If anyone is injured on set, who’s going to cover the medical bill? Be sure to keep these things in mind as you plan your shoot and research potential crew.

RESEARCH

Once you have a rough idea of how you’ll be allocating your budget, you can start researching crew who would be a good fit for the assignment. This will depend mainly on how many people the shoot requires, what types of crew you need, and the location of the production. Aside from looking to folks you’ve worked with in the past, Wonderful Machine’s Find Crew page is an excellent place to start. We’ve built and maintained this database over the course of ten years, and we’re constantly updating it as people join and leave the industry. Covering 27 different crew specialties, it includes everything from animal agencies to set designers, and lists crew from all over the U.S. and beyond.

Expert Advice, Find Crew, Hiring Crew for Photo Shoots, Wonderful Machine 1

Once you’ve wrapped your head around our crew page and determined what’s required for your shoot, it’s time to start using this resource to search for your team! It’s a good idea to make a list of your top choices and then choose some additional crew members you can use as backups in case things don’t go exactly to plan (hint: they never do). Your pre-production timeline will determine if you’ll have this luxury, as various factors can affect your shoot dates. If you’re shooting outside and on-location, the weather can change. If the client suddenly needs to push back a date due to issues on their end, you need to be ready. If the scope of the project changes and you have to add an additional shoot day, will you have the right crew in place? Because there are so many factors that can lead to a date change, it’s important to have a backup plan that accounts for unforeseen circumstances. Flexibility and being able to turn on a dime is key!

Expert Advice, Find Crew, Hiring Crew for Photo Shoots, MGM, Wonderful Machine 1

Behind the scenes of our shoot with MGM 

Having backups in place really came in handy during a recent shoot Wonderful Machine produced for MGM National Harbor. We were shooting a wide variety of commercial spaces before construction had even been completed at the casino and hotel. We had initially planned the shoot for nine consecutive days, but due to unmet construction deadlines, we needed to split the project in half and return to the location twice. We were already a few days into the production when we learned of the construction snafu, but I was still able to quickly adjust our shoot schedule. Between the two assistants I’d booked for the original shoot dates, I lost one due to a scheduling conflict. All of a sudden, I was short an assistant!

My first move was to ask the remaining assistant if he had any recommendations for locals whom he’d worked with previously. I sometimes take this approach because the remaining assistant will usually recommend someone they’re used to working with, making the shoot run smoother. When this failed, my backup plan sprang into action. I was able to contact an assistant I had on hold, who was thankfully still available to fill in. If that ended up being a no-go, I would have referred back to our robust crew database and began calling and emailing assistants in the Baltimore area. If I had not found a local via the database, my next step would’ve been to expand my search to either the D.C. or the Philadelphia metro areas.

Expert Advice, Find Crew, Hiring Crew for Photo Shoots, Charles & Colvard, Wonderful Machine 1
Behind the scenes shot of wardrobe stylist Christie Proud for a shoot that I line produced for Charles & Colvard.

OUTREACH

So! You’ve done your research, found crew members who’ll be a good fit for your production, and established backup plans B, C, and D. What’s next?

As long as you have the signed estimate or bid from the client in hand, it’s outreach time! My personal preference is to start with a phone call, complete with a follow-up email. This is especially important if they didn’t answer the initial call and I left a message. I personally feel like no one talks on the phone anymore and that conversation is rarely held outside of email and text messages. I like to keep it old school and give someone a good old fashioned phone call to get to know them. This also gives me the opportunity to ask questions if I need to speak with them about something specific like lighting techniques, hair & makeup direction, or wardrobe specs — things like that. I like to use phrases like “potential project” and “checking your availability” and “tentative hold.” I’ve found this sort of language is polite and precise but doesn’t make specific promises just in case things don’t pan out. Once you’ve checked that they’re available on the shoot days, go ahead and put them on hold.

PLANNING

It shouldn’t come as a surprise that specific types of crew are going to require different levels of planning and coordination.

When the shoot calls for catering, for example, I make it a point to ask if the crew and talent have any food allergies or restrictions in my initial phone and email. Although most shoots don’t require catering, it can be one of the most difficult aspects of crew to get right because you need to account for many different food preferences and expectations. Trust me, I’ve been on shoots where the catering has been a nightmare. I like to make sure there are always a few protein and vegetarian options and I always bring a few craft trays (food the crew can munch on all day instead of at a specific meal time) to each shoot as a backup. I also like to keep the meals light so that the crew isn’t falling asleep halfway through the day. Another crucial trick to keep people awake is to have lots of fresh hot coffee (or cold brews) on set at all times!

We recently worked with an amazing caterer in Denver for a job that we produced last summer with the local agency Karsh Hagan. This was a major production with a large crew and a lot of talent. We were shooting outdoors and in multiple locations each day, and thank goodness the weather was in our favor the whole time (even though it was unseasonably hot). With a few calls and a lot of Yelp reviews, we stumbled upon All Love Catering. Their team was amazing; they managed everyone’s food allergies, had multiple options at each meal, and provided different menus throughout the shoot. I did send them a copy of the production book, which we reviewed over a phone call so that they knew when and where we were shooting each day and could anticipate timing for set-up and break down.

Expert Advice, Find Crew, Hiring Crew for Photo Shoots, Karsh Hagan, Wonderful Machine
Our shoot in Denver for Karsh Hagan

Expert Advice, Find Crew, Hiring Crew for Photo Shoots, Charles & Colvard, Wonderful Machine 2
Dave Albanese, Peter Grill, Denny Henry, and photographer David Aaron Troy working on the set of our shoot with Charles & Colvard.

FINISHING TOUCHES

A few days before the shoot, when we are ready to move forward with securing the final crew, I send another email confirming dates and then release any crew that I had in reserve as a hold. I usually leave it up to the hair and makeup stylists, wardrobe stylists and prop stylists to hire their own assistants; they tend to work with regular assistants and have established relationships. After all of the details are finalized, I will send the crew a copy of the production book that includes location information, call times, shoot schedule, and creative brief (if applicable). Some shoots require a pre-production call with the photographer and crew in order to review the production book together. Others don’t necessitate a call, like if you’re familiar with the crew and have worked with them before. It all depends on the scope of the project and the personal preferences of those involved.

Expert Advice, Find Crew, Hiring Crew for Photo Shoots, Wonderful Machine 2
Yours truly, smoothing out all the details! Get It?

FOLLOW UP

So hopefully your shoot went smoothly!

Now it’s time to follow up! This might seem like a no-brainer, but you would be surprised how many people I’ve encountered who don’t send a thank you message or some kind of debriefing about the shoot to the crew. This lets them know they did a good job and you were happy to work with them. Apart from being a common courtesy and the polite thing to do, this will give your crew members a more positive feeling when they remember the production and they’ll be more likely to want to work with you in the future. And of course, once they send an invoice, please do pay it in a timely manner.

So there you have it! This article is by no means comprehensive, but we hope it gives you a rough outline of the crew booking process.

As I mentioned earlier, Wonderful Machine’s database covers multiple crew specialties, so when you’re in a pinch to find a caterer, studio space, prop stylists, or location scout, feel free to use our shoot production services! Putting it all together can be daunting, especially with all of the moving parts and scheduling concerns associated with a high production photo shoot, so please don’t hesitate to reach out if you’d like some assistance. I’ll more than happy to help!

Expert Advice: Releases and Permits

Craig Oppenheimer, Wonderful Machine

It’s my job to love paperwork. From estimates to production books to invoices, I’m responsible for creating, organizing and understanding all of the documentation needed to manage a production. Three of the most important pieces of that paperwork puzzle are model releases, property releases, and permits. No matter how big or small a production is, proper documentation is essential to not only obtain formal permission to shoot in a specific place, but to also ensure your ability to make use of the images you capture that feature people and certain locations for a commercial project.

Generally speaking, a model or property release is a contract that documents the consent of the subject(s) or property owner(s) to allow their likeness or the likeness of a property to be used in a certain way. It’s important to understand that using a person’s likeness to promote a company for commercial gain can be incredibly valuable to that company, and the people featured in those images should understand this value. The formal documentation of consent is therefore very important, and releases protect the photographer and their client should a disagreement arise over the use of an image that includes any person or property.

Let’s start with model releases. Here is a run down on when you typically do and do not need a model release:

You DO need a model release if the subject is identifiable and the images will be used commercially (to promote a particular product, service, company, or cause). That includes (but is not limited to) paid advertising use of the images in print ads, web ads or billboards, as well as collateral use in brochures, direct mail pieces or a client maintained website and/or their social media outlets, to name a few. Additionally, while this is often overlooked, you should acquire a model release from anyone featured in an image within your print/online portfolio.

You DO NOT need a model release if the images will be used editorially (for the purpose of educating and/or conveying news or opinion). That includes placement in a magazine, newspaper or media outlet available for sale or viewing to the general public, which does not seek or accept sponsorship to, or in itself, promote a particular product, service or company. Additionally, you do not need a model release if the subject is not identifiable, even for commercial use. That being said, you should be aware that a subject’s face is not the only thing that might make them identifiable.

I should note that while a release isn’t needed for most editorial uses of an image, many (but not all) publishing companies do have clauses in their agreements requiring the photographer to obtain a model release from the subject. In my experience, this clause covers the publishing company from a liability perspective, but in most cases, both parties often ignore it unless the shoot features hired talent, kids, or if the subject matter of the article is controversial in any way. If an editorial contract states that releases are required, a discussion about this should take place, and I’d recommend asking the publishing company to provide the release they want to be signed.

So, what’s the best release to use? Well, there are a lot of forms available online (like these from ASMP and Getty) as well as many different apps (like Releases or Easy Release), many of them aren’t applicable in all situations or are a bit too broad (also, since releases are formal contracts, they are subject to state law, and it’s important to find out if there are any peculiarities that may require adjustment). For our purposes, we are typically working with professional talent (and/or their agents) who we negotiate specific usage with, for a specific fee, and therefore want to note such information on the release. Here is our model release:

Executive Producer Craig Oppenheimer, Model Releases, Property Releases, Do I need a Model Release, Best Model Release Template, Best Property Release Template, Wonderful Machine, WM Estimating & Production, Wonderful Machine Expert Advice

You’ll notice we include a space for an image of the talent for reference. Since we often work with casting directors and hire professional talent, I’ll have their digital headshot and can drop that image on the release before getting them to sign it. Alternatively, using a Polaroid or other instant-print camera is a good option as you can staple the picture to the release after you have the talent sign it. Another method for other releases that don’t have a field for visual reference would be to take a picture of the person holding the signed release after signing it, so you can have both that image and the scanned release on file to identify the person.

Ok, you have a signed model release, so you are ready to go, right? Well, not necessarily. Property needs to be released too, and the basic rules detailed above for when you do and don’t need a release can be similarly applied to properties. You don’t need a release if the usage is editorial, but you do need a release if the property is easily identifiable and for commercial use, most of the time…

It’s understandably not always black and white, and there are a few key points to note about locations and releases. First, you need a release to include trademarks or copyright protected artworks in an image for commercial use. That includes logos on the facades of the buildings, murals, statues, and public art. Also, it’s important to know that certain architectural or design elements incorporated into a building can be trademarked. For instance, you can photograph the Eiffel Tower during the day without the need for a release, but the lights that appear in the evening are a trademarked design. You would, therefore, need to seek permission to use the image for commercial purposes if the image was taken at night when the lights are displayed.

Additionally, if you photograph a space that has art displayed, you would need a release from whoever owns the copyright to that piece of art, as well as, a release from the owner of the property in which the piece of art is displayed (if the location is identifiable) in order to use the image for commercial purposes. If you are unsure of whether or not there are any restrictions or limitations on a certain building or public work of art, you can contact your local film office, and they should be able to provide guidance on popular destinations or areas within your city.

As with model releases, there are forms you can find online from ASMP and Getty. On nearly every production I’ve worked on, our client has had location releases that they’ve asked us to use, however, we have our own as well. Here it is:

Executive Producer Craig Oppenheimer, Model Releases, Property Releases, Do I need a Model Release, Best Model Release Template, Best Property Release Template, Wonderful Machine, WM Estimating & Production, Wonderful Machine Expert Advice

You’ll notice on our release that usage is not something we call out in the same way as we do on the model release, as usage typically isn’t a factor for locations (meaning, it typically just includes unlimited use). We do state that the release would cover unlimited use in all media, but it’s not displayed in the same way as we have it on the model release. That being said, location fees might differ based on the type of production (stills vs. video) and how big the production footprint is.

It’s also important to know the difference between a permit and a release. A permit allows you to be in a certain space at a certain time to take a photo, and a release allows you to use that image for commercial purposes. Permits are typically applied for and distributed by film offices or local government agencies, and each city typically has different rules for when you do and don’t need a permit.

Generally, it comes down to the size of the production footprint, and in many cases, a photographer acting alone with very minimal equipment does not need a permit. On the other hand, in almost all instances, if the production involves multiple people, production RVs, street closures and any lighting/grip equipment, a permit is needed. Most film offices and government agencies will tell you that if the shoot is for any commercial use, that you need a permit, although the fees will likely be less if the shoot has a minimal production footprint. The permitting process in most cities can be time intensive and almost always has fees associated with it, so it’s important to do your research and figure out the cost and turnaround time for a permit before embarking on a production.

Here are two examples of permits I applied for and was provided by the New York City Film Office and the US Department of the Interior:

Given the preparation and hard work that goes into capturing images on a production of any size, it’s incredibly important to cover your bases and make sure all the people, places and things in the images are appropriately released in order to avoid legal trouble when the images are actually used.

*Legal Disclaimer* – Please consult with an attorney to discuss legal documents pertaining to your business before putting them in use. I’d like to extend a thank you to Adam G. Garson of the firm Lipton, Weinberger and Husick for his contribution to this article. If you need professional legal counseling, please contact Adam at agarson@garson-law.com or by phone at (610) 565-7630. If you need help estimating or producing a shoot, please email me at craig@wonderfulmachine.com, or you can reach me on the phone at (610) 260-0200.

Pricing & Negotiating: Lifestyle Shoot for Technology Company

Craig Oppenheimer, Wonderful Machine

Shoot Concept: Lifestyle images of professional talent using a mobile application.

Licensing: Web Collateral and Web Advertising use of up to 15 images in perpetuity.

Location: A residential property

Shoot Days: 1

Photographer: Lifestyle specialist

Client: A technology company

Here is the estimate:

pricing and negotiating, lifestyle shoot, production, photography production, wonderful machine, estimating, photographer pricing, craig oppenheimer

Job Description and Fees: The client was a relatively new player in the mobile app space, and while they weren’t quite a startup, they were young in the industry and about to make a big marketing push. The concept for the shoot focused on two people using the app and accompanying accessories on various mobile devices within a house, and they also needed environmental still life images of those devices as well. The usage was entirely web-based, and they planned to primarily use the images on their website, and potentially run web ads with a handful of them as well. While the requested usage included a perpetual duration, the devices themselves and the technology used would limit the shelf life of the images to about a year, as they’d quickly become outdated with new product launches (by the client and by third party retailers).

I priced the first image at $2,000, images #2-3 at $1,000 each, images #4-6 at $500 each and images #7-15 at $100 each. That totaled $6,400, which I rounded up to an even $6,500. I’d typically extrapolate this number to account for the perpetual duration, but the shelf life in addition to the fact that the client was handling the majority of the production (which meant that it wouldn’t be a huge time/energy commitment for the photographer) helped justify leaving the fee right at $6,500. Speaking of the production elements, I made sure to note everything that the client would be providing which included the location, casting/talent, hair/makeup/wardrobe/prop styling, production coordination and catering.

Photographer Scout/Pre-Production Day(s): I included one day for the photographer to go scout the property with the client. I’d typically include $1,000 for this, but we were trying to keep the estimate as lean as possible, and based on the time crunch, it was apparent that the scout day would likely be limited to just a few hours, which helped justify bringing the fee down a bit.

Assistants: Despite a request from the client to limit the crew to just one assistant, I included two for the shoot day as we anticipated the need to move a decent amount of equipment around through the house (and potentially outside) throughout the day. Based on the market, this rate was appropriate to bring on the necessary team.

Digital Tech: I included a tech for the shoot day who would help to display the images to the client as they were being captured. I included the expense of their laptop workstation in the subsequent equipment fee.

Equipment: This accounted for $800 in cameras/lenses and $700 in grip/lighting rentals, in addition to $500 for a laptop workstation.

Mileage, Parking, Misc.: Since the client was providing the majority of the production coordination, there wasn’t much else that needed to be included, however we did add a couple hundred dollars to account for minor miscellaneous expenses that might arise.

Shoot Processing for Client Review: While the digital tech would be organizing the files during the shoot, I included $250 for the photographer to go through all of the images after the shoot to remove any that they felt weren’t appropriate and create a web gallery of a reasonable number of photos for the client to consider.

Color Correction/File Cleanup/Delivery of 15 Selects: The agency wasn’t looking for any major retouching or compositing from the photographer, and only requested that they adjust color and apply very basic processing to the images prior to sending the high resolution selects back to the agency. I included $100 per image to accomplish this.

Results: The photographer was awarded the project.

Hindsight: We’ve estimated many projects previously where the client informs us that they are coordinating the majority of the production elements, and sometimes it doesn’t always go smoothly. If there’s an agency involved with an internal producer, that typically increases our confidence in their ability to line up a successful shoot day, but when an agency isn’t involved, and when a client is seemingly inexperienced, that definitely gives us pause, and it’s hard to reflect that feeling in the estimate. Fortunately, this particular client did a great job and streamlined the production with ease and professionalism, which was a huge relief. The shoot went well, and the images reflected the preparedness of the client.

If you have any questions, or if you need help estimating or producing a project, please give us a call at (610) 260-0200. We’re available to help with any and all pricing and negotiating needs—from small stock sales to large ad campaigns.

Pricing & Negotiating: Stills and Video for a Pharmaceutical Company

Craig Oppenheimer, Wonderful Machine

Shoot Concept: Individual portraits of three women against a white background

Licensing: Unlimited use (excluding OOH) of up to three images for two years

Location: A studio in the Northeast

Shoot Days: One

Photographer: Portraiture specialist

Agency: Small, based in the Northeast

Client: Large pharmaceutical company

Here is the estimate:

Creative/Licensing: 

The concept was straightforward: the agency/client hoped to photograph three women of a specific demographic individually against a white background. The agency was redesigning a website for a new drug the pharmaceutical company was manufacturing, and while this would be the main use for the images, they also had plans to run a few consumer-facing print ads over the course of two years. Additionally, they were considering the possibility of creating cinemagraphs of each woman, however, the exact creative concept for this was still being developed.

While the simple concept put strong downward pressure on the fee, their requested usage drove it up. I decided to price the first image at $6,000 and the second and third images at $2,000 each as it was clear based on the creative brief that one of the women would be the “hero” talent and her portrait would be used much more heavily than the others. $10,000 felt a bit low at first, but considering the client’s intended use, the straightforward nature of the project, and the fact that there were a handful of other known local photographers in the mix for the project, I felt it was in the right spot.

As for the cinemagraphs, the agency asked to see ballpark costs to add them later if desired, so we noted an optional creative/licensing fee of $2,000 in the job description section of the estimate (we also noted the expenses, which I’ll detail later). I based this on $1,000 for the first, and $500 each for the second and third cinemagraphs, which would live on their website if they chose to move forward with this option.

Assistant and Digital Tech: The photographer was comfortable with just one assistant, and we included a digital tech for $500 while including another $500 for their workstation.

Producer and Production Assistant: This included two prep days, one shoot day, and one wrap day for a producer, and they’d bring along an assistant for the shoot day to be an extra set of hands throughout the production.

Hair/Makeup and Wardrobe Stylists: We just needed one hair/makeup stylist since there were only three women, and we’d have plenty of time to get each one ready on the shoot day. As for wardrobe, I included two prep days and one shoot day for the wardrobe stylist, and two prep days, one shoot day and one wrap/return day for their assistant. The agency anticipated that we’d shoot each of the three women in two different outfits, so I included $250 per outfit for six total non-returnable outfits.

Casting and Talent: This particular market had relatively affordable casting and talent rates, and we included one live casting day and a talent rate that would easily attract a wide pool of talent to choose from. The rate was a bit higher than I’d typically include for this market/usage, however, we wanted to provide the talent with an incentive for their likeness to be used to promote a drug while portraying them as a person who may be afflicted with a certain sensitive illness. Additionally, the client requested an optional rate if they were to acquire exclusivity on the talent for this within the pharmaceutical industry, and we noted the appropriate increase in the rate, which was based on a conversation I had with our casting director.

Studio Rental and Equipment: We included one day for a local studio, and added an equipment fee to either use the photographer’s personal equipment or cover rentals from the studio or local rental houses if needed. We also detailed that if they wanted to create cinemagraphs, that it would likely require an increase in the studio expense to afford a better-equipped space for capturing video (mainly appropriate power/electric access). Additionally, if video for the cinemagraphs were to be captured, we would need to light the entire set with continuous lights as opposed to strobes, so we detailed a price increase to include a grip, gaffer, grip truck and plenty of lighting in order to achieve this.

Catering: There would be 17 people on the set, and I included $65 per person for breakfast and lunch.

Parking, Production Supplies, Misc.: This just covered $100 in parking, $100 in supplies such as tables/chairs, and $100 for any unforeseeable expenses that might have presented themselves during the shoot.

Shoot Processing for Client Review and Retouching: We included $250 for the photographer to go through all of the shots and do a basic once-over in order to present a web gallery of options to the agency. Additionally, we included $375 per image to cover the time it would take a retoucher to process the images and swap background colors, which is something the agency mentioned would be a possibility as they developed new brand colors for the client.

Feedback: The estimate was well received, however, the agency had a few updates they wanted us to include. Primarily, they wanted to include four women, instead of three. Additionally, they wanted to include the fees/expenses for both still images and cinemagraphs within the estimate, and they asked for us to include the talent rates with exclusivity as well.

For the creative/licensing fee, we already quoted an optional rate of an additional $2,000 to include the cinemagraphs in the first estimate, so now we needed to figure out what one additional image and one additional cinemagraph was worth for the fourth talent. I determined the image was worth $2,000 (the same as images 2 and 3), the cinemagraph was worth about $500, so I rounded this up to an additional $3,000, totaling a $15,000 fee.

This of course also impacted our expenses. We added additional wardrobe along with the talent rates requested, adjusted for catering, misc. expenses, and retouching while adding a hair/makeup stylist assistant to help move the shoot along since we had one extra talent to prep. We increased the studio as well to accommodate the equipment, crew size, and electrical access needed for the video, and we incorporated the grip, gaffer, and additional lighting equipment into a single line item. We also noted a TBD overtime rate, as we were now proposing to shoot four talent, each in two different outfits, with stills and video for each. While that would take a while, I was still confident we could make that work in a 10-hour shoot day, but I wanted to note the rate ahead of time.

Here was the revised estimate:

Feedback: Again, the estimate was well received, however, they decided to revert back to three talent, instead of four. Also, at this point, the cinemagraphs became better defined as we started to inquire more about the creative concept. The success of a cinemagraph typically relies on some sort of environmental element moving or changing in some way, but since we were just capturing a few women in front of a white background, our options were pretty limited. After a creative call with the agency, it turned out that they just hoped to capture short videos of the women making subtle changes to their expression and slightly moving their bodies (often referred to as “video portraits”), and we were told that the agency would handle the video editing.

We made a few tweaks to our estimate, and submitted the following:

Results: The photographer was awarded the job, and we coordinated the production.

If you have any questions, or if you need help estimating or producing a project, please give us a call at (610) 260-0200. We’re available to help with any and all pricing and negotiating needs—from small stock sales to large ad campaigns.

Pricing & Negotiating: Stock Licensing

Jess Dudley, Wonderful Machine

Licensing: Web Collateral use of up to three images for two years

Photographer: Southeast-based portrait specialist

Agency: N/A – Client Direct

Client: The philanthropic arm of a recognizable consumer brand

Here is the estimate:

A seasoned portrait photographer came to us looking for assistance pricing a stock licensing agreement for a large corporation interested in using three existing images on the “.org” website of their philanthropic division. The shoot had originally been commissioned by an editorial client for a piece about the subject’s philanthropic endeavors and organizations, so before determining the value, we first had to review the original commissioning agreement to ensure the photographer had the ability/permission to license the images to a third party. Even the most favorable editorial agreements typically include an embargo period which may prevent one from licensing content for a reasonable period of time after publishing and some of the least favorable editorial agreements restrict licensing in more substantial ways. As it happened, these images were available to license, so on we went.

The difficulty with determining the value of any licensing, as it is all so subjective and project specific, is figuring out an anchor price from which to adjust, based on the various contributing factors. At Wonderful Machine, we use a tried-and-true benchmark that sets the baseline cost for collateral use (“Collateral” use is when the work appears in or on a platform that the client wholly controls and produces, such as a company website, annual report, brochure, or social media profile, and is intended to promote a commercial product, service, personality or brand) of one image, for one year, at around $1000, and additional images licensed for concurrent use should be worth about 50% as much as the first image. We also use a pricing model that assumes a doubling of the duration of use should increase the worth by about 50% more than the initial duration value. These “rules” can break down really quickly, as general rules tend to do when you move too far from the baseline. In this case, however, we were still very much within the tolerances.

Pricing this project out based on these guidelines would set the value of the first image at $1500, and each additional image at $750, for a total licensing fee of $3000. With this anchor in mind, I began factoring in all of the variables that apply upward or downward pressure on the value. Much like estimating licensing fees for a commissioned shoot, valuing stock requires you to consider the prominence of the client, scope & duration of the requested use, and the importance of the content to a given “campaign.” But you also have to consider the uniqueness of the subject matter, availability of similar images in the marketplace and the prospects & costs of recreating the content (or very similar content).

These images didn’t depict the client’s products or services in any way and the subject matter wasn’t terribly unique – the images were lovely, straightforward, environmental portraits of the subject in her workspace. Although the content didn’t make these images unique, the availability of similar images, or lack thereof, did. There were very few stock images available in the marketplace. This applied upward pressure on the value of the images. Also, reshooting was pretty much off the table because of the subject’s scheduling constraints and general aversion to being photographed. This, combined with the general inconvenience and uncertainty of commissioning a new shoot, meant that we could push past any reshoot “price ceiling” that may typically apply. So not only are existing images rare, but creating new photos would be a tall order. Again, this pushed the value up. The license was limited to web collateral use which tugged the baseline number down (our guideline is based on both print and web). But since the client is an arm of a name-brand multinational mega-company, the value jumped, even though the particular arm of the organization is 100% philanthropic in nature.

The intended use of the pictures was informational, almost editorial. The client was interested in the images because the subject ran an organization that relied on the client’s products and services to further the organization’s core mission of doing some form of good in the world. The client was basically writing a case study about how they’d partnered with the subject to help her to do good. Additionally, this was one of many such case studies on the client’s website, meaning it was valuable to the client, but not mission critical, exerting downward pressure on the value. Finally, the case study could be effective with one image, but three would be slightly more impactful by offering a touch of variety. If the client had been requesting images that each featured a different founder, we’d be less likely to drop the additional image rate quite so much, if at all. All this to say that our usual price breaks for additional images would be appropriate.

Taken together, I felt the upward pressures were more significant than the downward pressures. Accordingly, I added 50% premium to the baseline rate ($3000) to account for the additional value, setting the quote at $4500.

RESULTS/HINDSIGHT:

There’s an opportunity to push the envelope a bit when pricing stock because, in most instances, the photographer has more leverage and is dealing with a captive audience. In this case, I may not have pushed the envelope enough, as the client quickly accepted and returned the signed quote. Even though the photographer was happy with the fee, I still wondered if perhaps there was a little dough left on the table.

If you have any questions, or if you need help estimating or producing a project, please give us a call at (610) 260-0200. We’re available to help with any and all pricing and negotiating needs—from small stock sales to large ad campaigns.

Pricing & Negotiating: Lifestyle Images for Retailer

Craig Oppenheimer, Wonderful Machine

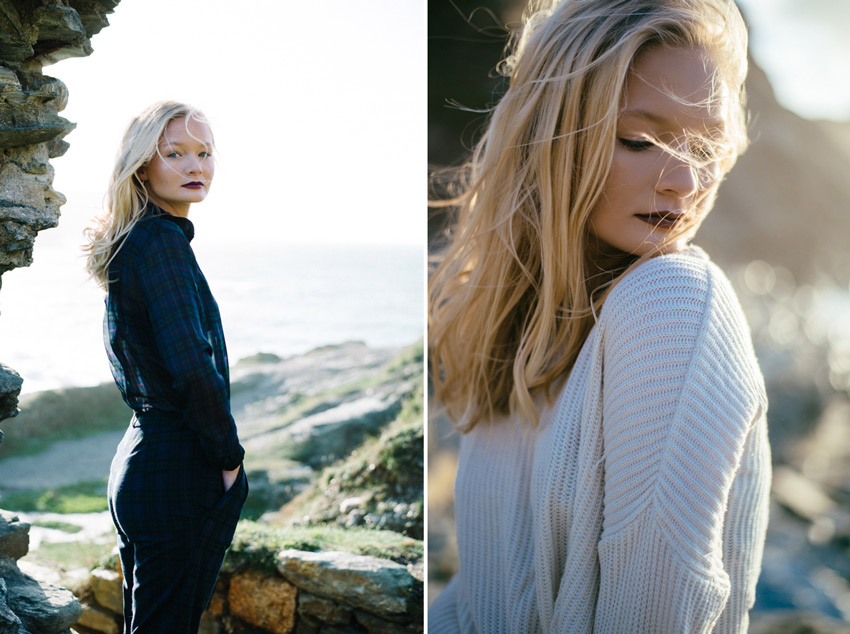
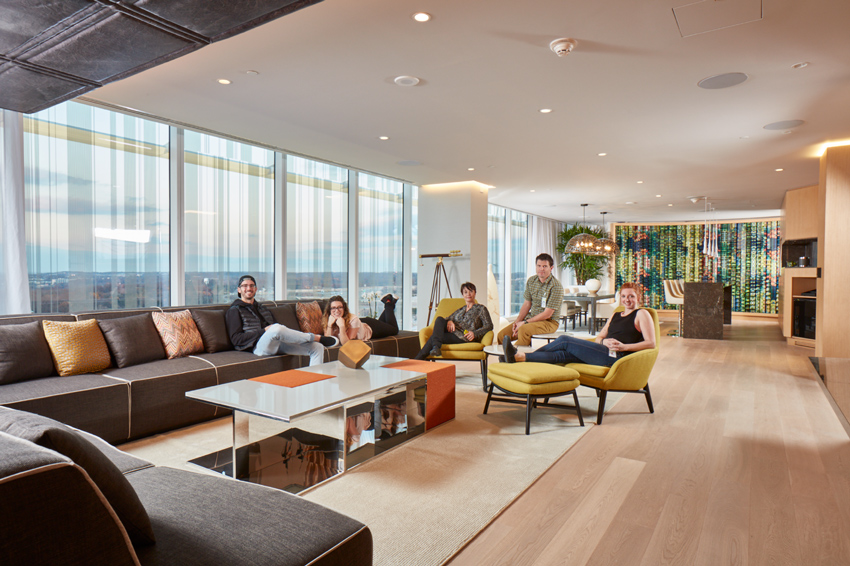
Shoot Concept: Architectural images and environmental lifestyle images of customers and sales representatives interacting in a retail location

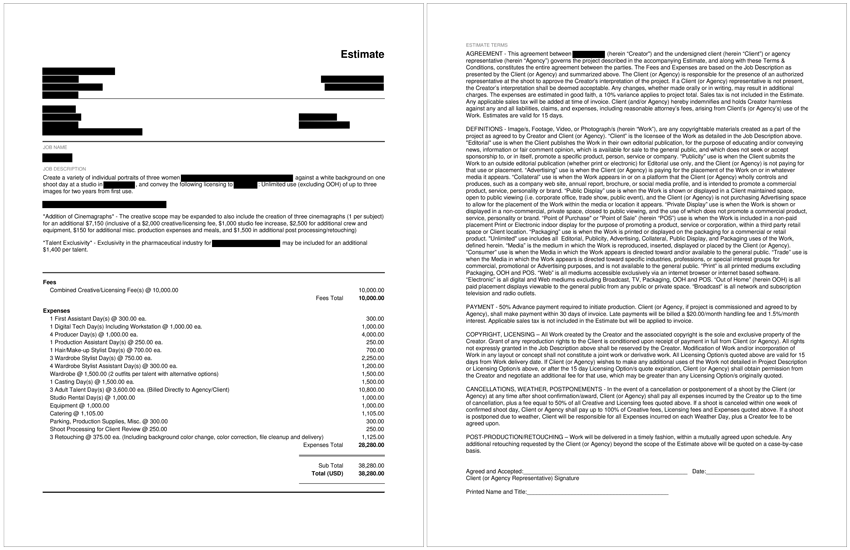
Licensing: Unlimited use of 12 images for one year

Location: A retail location in the northeast

Shoot Days: One

Photographer: Architectural and portraiture specialist

Agency: N/A, client direct

Client: A retail chain

Here is the estimate: 

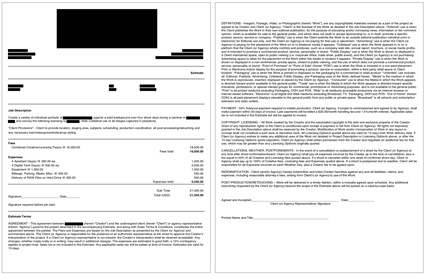
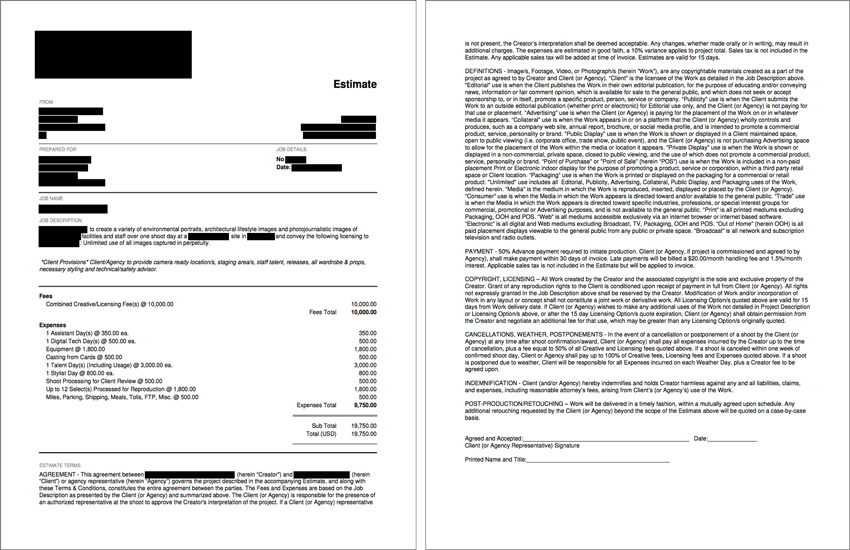
Creative/Licensing: This was the third time in as many years that the client approached the photographer to create images of newly opened retail locations. The first two projects had a similar initial scope in terms of creative requirements and licensing, and a precedent had been set regarding the client’s budget and what the photographer had agreed to regarding creative/licensing fees. In this case, I found out that while the client requested unlimited use of 12 images for one year, their intended use mainly included one image for local advertising use that would likely be minimal, while the other images would end up on the client’s website to showcase the new retail location. I also found out that they had a $40,000 budget they were trying to hit for this particular project.

I’d typically anticipate that for one year of local advertising, an appropriate fee for the first image is in the neighborhood of $3,000. Then I’d apply a discount for the additional images given their likely intended web collateral use, likely pricing the second image at $1,500, images number three to five at $500, and images number six to twelve at $250 each. That totals to $6,250, however, based on the current budget and the previous precedent of the other projects, $5,000 was more appropriate.

Photographer Travel/Scout Days: The photographer would travel in and scout the location the afternoon prior to the shoot day, and then fly back home the day after the shoot. I, therefore, included two travel/scout days.

First Assistant/Digital Tech and Second Assistant: The photographer had a first assistant who could double as his digital tech, and I included $500 for their day with an additional $500 for a small workstation. Additionally, I included a second assistant to help with grip/lighting.

Producer and Production Assistant: I included three prep days (including the time to go scout the location), one shoot day and one wrap day for the producer to line up a crew and coordinate the project from start to finish. Additionally, I included two days for a production assistant; one day to help either the producer or photographer prior to the shoot and one day for the shoot.

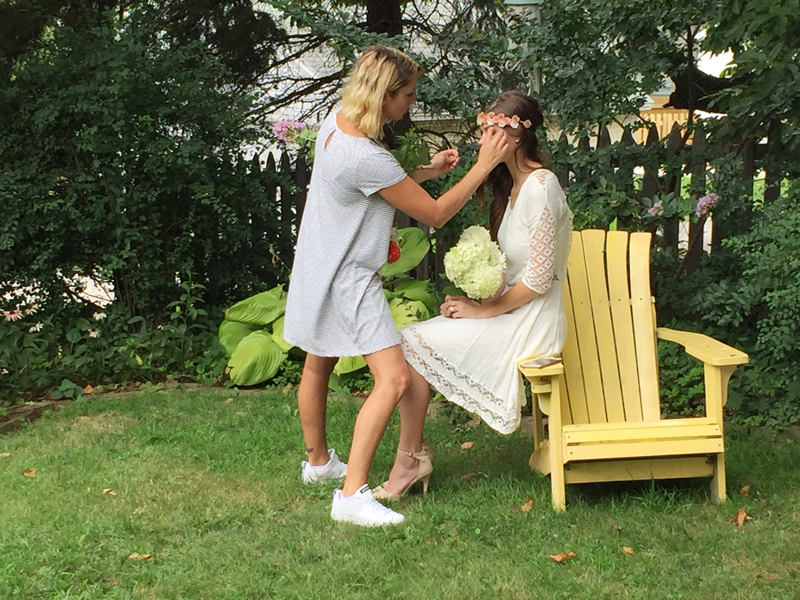
Hair/Makeup and Wardrobe Styling: The initial scope of the project called for 15 talent, and the shot list made for a rather ambitious shoot day schedule. Given these factors, I included two hair/makeup stylists, rather than a stylist with an assistant, as we needed an experienced team to help move the styling process along as fast as possible. As for the wardrobe, only the principle talent would need to have clothing sourced for them, while the secondary/extra talent would provide their own wardrobe. I included three prep/shop days and one shoot day for the wardrobe stylist while anticipating that their assistant would be on-site for the shoot, and then handle wardrobe returns after the shoot. I included $3,000 for the wardrobe, anticipating about $375 per principle talent.

Casting and Talent: Rather than doing a live casting, we included $1,000 to cover an additional day for the producer to handle a digital casting process. This included reaching out to multiple local talent agencies, organizing headshots and web galleries of talent for the client to consider, negotiating rates and booking the chosen talent. We included $1,800 for each principle talent, which was appropriate for the usage in this market, and $450 for each extra secondary talent.

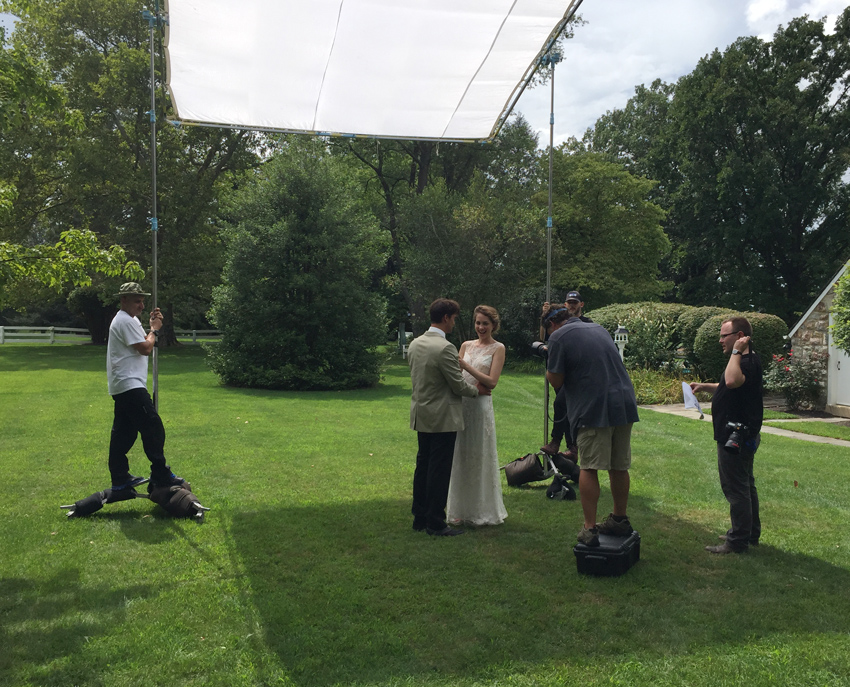
Production RV: While the location would offer enough space for all of the crew/talent/client to stay within the building comfortably, I anticipated that the hair/makeup stylists would need a space to prep the talent, and the wardrobe stylists would need an area to spread out the clothing. Also, I anticipated that an RV would be a nice area to get as many cooks out of the kitchen as possible, and if needed, it would serve as a private space with wifi where the client could escape from the production. $1,500 included gas/mileage, travel time, generator run time, dumping fees, and other misc. expenses that RV’s typically charge for.

Equipment: The photographer planned to capture most of the content with available light, and in an effort to keep the bottom line down, we did not include any expense to use the equipment he planned to bring.

Travel Expenses: Round trip tickets to/from the location were about $300, and I included $50 in baggage fees for the outgoing and return trips. Lodging in the area was about $150/night for two nights, and I included $200 for a car rental, a $50/day per diem for the three days the photographer would be traveling.

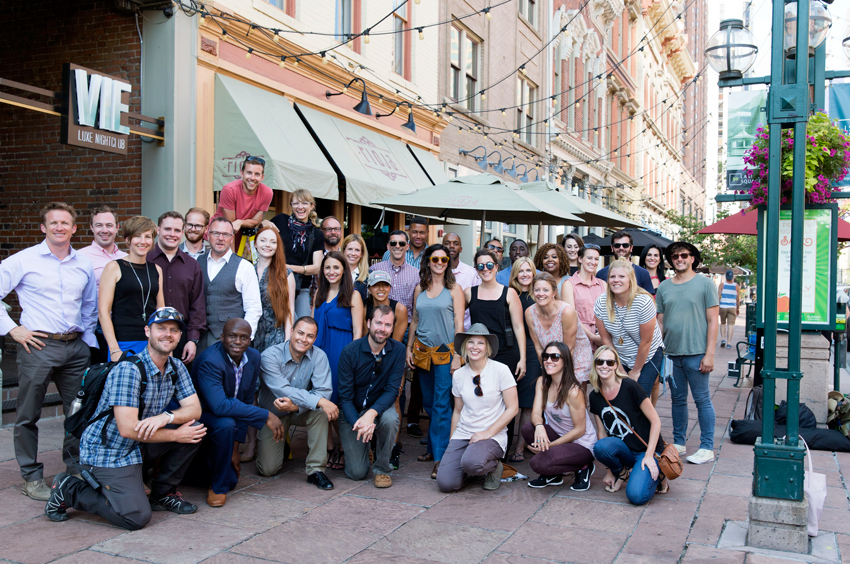
Craft/Catering: I included roughly $35 per person for a light, quick lunch and snacks, anticipating nine crew members, 15 talent and six client/agency representatives.

Mileage, Parking, Additional Meals: This included $200 in mileage for crew members to travel to/from the location. $200 in meals and expenses that the wardrobe stylist and their assistant would incur while shopping for clothing. $150 for miscellaneous expenses and $250 in additional meals for a client/agency pre-production meeting and a client dinner after the shoot.

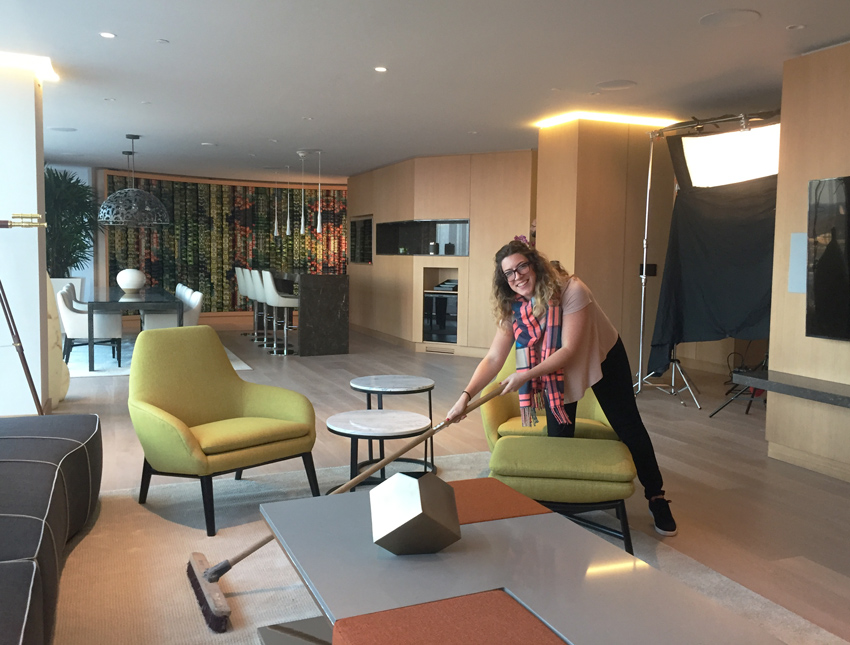
Production Supplies: This included $200 for table and chair rentals, $100 in tent rentals, $100 in floor protection and cleaning supplies, and $50 for miscellaneous supplies.

Shoot Processing for Client Review: This covered the photographer’s time to organize all of the assets and create an initial gallery of images for the client to review.

Post Processing: I included $50/image for basic color correction, file cleanup and delivery of the images. For architectural images, I’d typically include at least $150/image, however, we had already surpassed the client’s budget, and the photographer was willing to give a discount on the post processing.

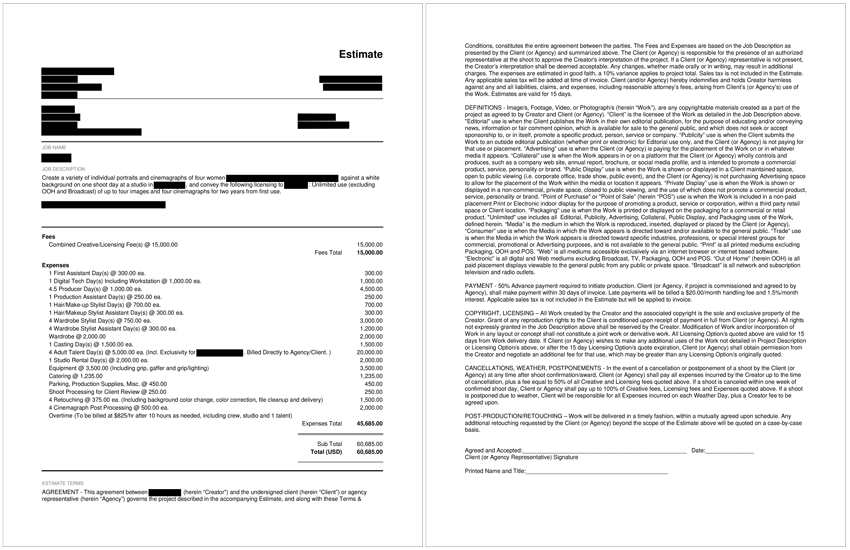
Results: The client signed the estimate, and the photographer was awarded the assignment. Just as quickly, the client mentioned that they planned to bring in their ad agency to provide further creative direction and help move the project along. While it was surprising, we welcomed the additional clarification. However, we quickly realized that the agency had different expectations for the production that weren’t originally prescribed by the client.

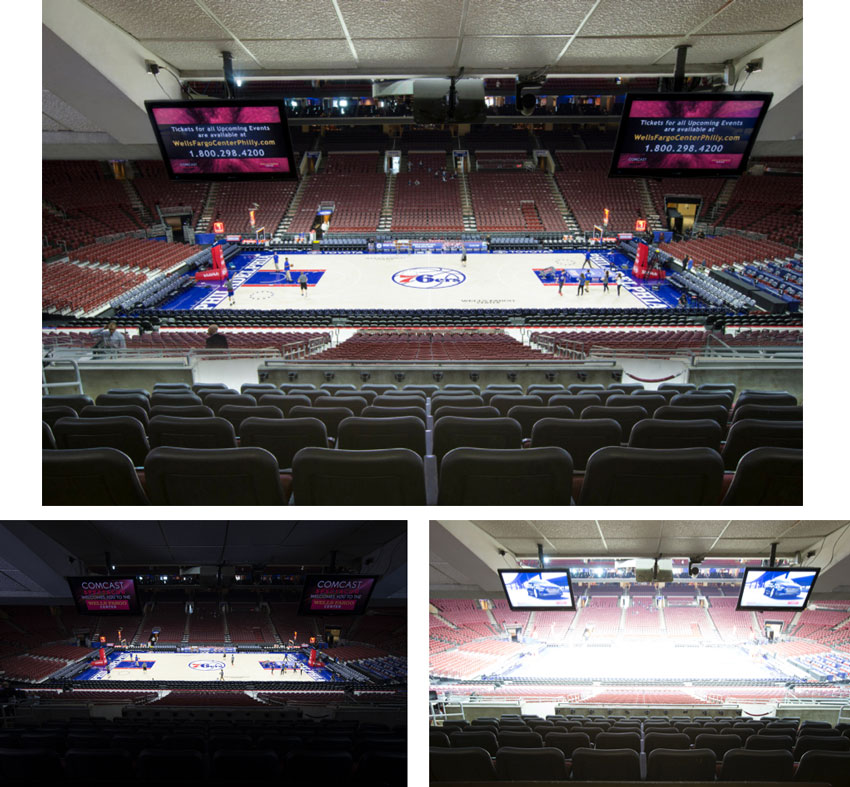
Generally speaking, they wanted a much higher level of production, and the biggest change was that they hoped to shoot throughout the night while the store was closed, rather than shooting throughout the afternoon and into the early evening hours as originally anticipated. The agency also wanted the store to appear as if it were daytime, and have sun coming in through the windows. This meant that we’d need to bring on a grip and a gaffer with a grip truck to rig up large continuous lights outside of the windows, and I added $5,500 to accomplish this ($650 for the gaffer, $450 for the grip and $4,000 in grip/lighting equipment, trucking, generators and misc. expenses). Additionally, this meant that we’d need to feed everyone in a more robust way and ensure the coffee was fresh all night, so we added catering throughout the night.

The agency hoped to see a lot of the wardrobe that was to be procured prior to the shoot, so I added an extra day for our wardrobe stylist to provide pictures of everything and spend a bit of extra time shopping after receiving feedback. Additionally, the agency had insurance requirements that the photographer did not anticipate originally, so we included $1,500 to help increase his policy to meet their standards. Also, as we worked through these updates, the shoot date changed a few times, so we included a bit more in our travel expense line to account for airline change fees. Actually, the ever-changing schedule, increased production level and the re-negotiation of the project across the board meant the producer would be incurring additional time, so we included an extra day and a half for them to handle the workload.

The agency was able to make two concessions that helped bring the bottom line back down a bit. First, they were willing to limit the talent to seven principles and three extras, and second, they were willing to handle all of the post processing in-house.

As for the photographer’s fee, while the agency agreed to decrease the number of images licensed from 12 to eight, the shots they removed were mostly variations of similar secondary shots. Overall, I felt the additional shooting time coupled with increased creative requirements was worth an increase to the photographer’s fee, and we added an extra $1,500.

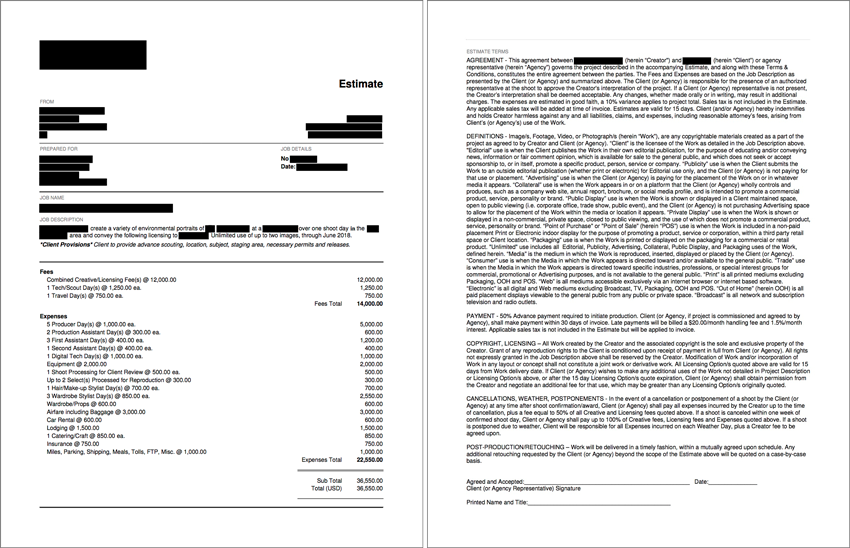
Here was the final estimate for the agency, which was approved:

Hindsight: In the end, an estimate that was $15,000 more than the client originally told us they budgeted was approved. The agency let us know that our final estimate was in-line with what they had anticipated for a production like this, and I feel they did a good job explaining to their client why all of these expenses were necessary. It’s highly unusual for a client to approve a project and then have their agency propose different project specs to bid on, but I think this was a result of the project occurring during a time when the client was transitioning from one ad agency to another. Other than the added stress during pre-production, the shoot went off without a hitch, and the images were quickly put to use a few weeks later.

If you have any questions, or if you need help estimating or producing a project, please give us a call at (610) 260-0200. We’re available to help with any and all pricing and negotiating needs—from small stock sales to large ad campaigns.

Pricing & Negotiating: Pharmaceutical Portraits

Jess Dudley, Wonderful Machine

Shoot Concept: Portraits and photojournalistic manufacturing lifestyle images

Licensing: Unlimited use of all images captured in perpetuity

Location: On location at a pharmaceutical manufacturing facility in the Northwest

Shoot Days: One

Photographer: Northwest-based portrait and lifestyle specialist

Agency: A Small Northwest-based agency

Client: A mid-sized pharmaceutical company

Here is the estimate:

pricing and negotiating wonderful machine, estimates for shoot production, shoot production estimates, executive producers who do estimates, estimates for photographers, wonderful machine production company, examples of photographer contracts, Jess Dudley executive producer, Pharmaceutical Portraits

Creative/Licensing: One of our Northwest-based photographers reached out looking for help pulling together an estimate for a library shoot for a local mid-sized pharmaceutical manufacturer. The agency had contacted the photographer requesting a quote for a one day shoot on location at one of their client’s manufacturing facilities. The project called for 12 setups: four environmental shots of the facility/labs, seven photojournalistic lifestyle images of employees “at work” and one lit/staged portrait. The client required unlimited usage of the library of images. We see a lot of projects along these lines, but this project was a bit unusual because the 12 setups were relatively specific. They didn’t seem to offer a lot of opportunity for variations (as opposed to more dynamic scenarios that may allow for a greater degree of variety in the space, subjects and available actions/activities). Shot one, in particular, was much more carefully composed and art directed because it would be used in trade ads, while the other 11 shots would only appear in collateral pieces. After speaking with the photographer about the hefty shot list, we wanted to make sure the client was aware that it was doable, but perhaps a bit ambitious, and that the day may require some prioritization if we were unable to move around as freely and quickly as expected.

Library fees can start around $7500 a day and will often include unlimited or perpetual usage of all images captured. It should be noted, however, that “library” does not necessarily mean unrestricted use (although it did in this case), and may be used to refer just to the volume of imagery. Accordingly, it is important to make the initial assumption that the client is willing to limit the use in some way. Often, clients are willing to limit either the duration of use or quantity of images for a library shoot, so it is best to begin the conversation with that assumption in mind to avoid inadvertently “giving away” more than necessary. Unfortunately, this was not one of those instances, and the client did, in fact, require unlimited, perpetual use of all images captured. Interestingly, the ambitious shot list helped to minimize the value of the library because the photographer would have to move so quickly from one shot to the next that the variety captured would be severely limited. Additionally, five of the 12 shots were very specific and didn’t allow for variations of any substance. Factoring the volume of shots, limited production footprint, type of client, intended use (including the very specific trade ad shot) and otherwise straight forward nature of the shoot, I set the rate at $10,000 for this shoot.

Client Provisions: I was sure to note exactly what the client and agency would provide: locations, staff “talent,” staging area(s), wardrobe, props, releases and necessary technical and safety advisors. The advisor was important to highlight since we wanted a client rep to be on set to ensure the facility and staff were up to snuff from a technical and safety standpoint. There’s nothing worse than wrapping up a shot and finding out that the subject was supposed to have been wearing safety goggles, so we were sure to put that responsibility on client’s shoulders.

*Tech/Scout Day: Due to the challenges associated with accessing this particular facility, the client was unable to allow for a tech/scout day. It’s generally a very important part of a production such as this, but unfortunately, our hands were tied.

Assistants & Tech: I estimated for a first assistant and a digital tech for the shoot. All but one shot would be captured using available light, and mobility within the facility was a concern, so the smaller the crew footprint, the better. The photographer wanted to tether a laptop on a tripod, so we didn’t need a full workstation rental from the tech, hence the lower rate.

Equipment: I estimated one day of gear rental from a local rental house including a DSLR system, a backup body, a handful of fast lenses, a small lighting and grip kit and a laptop to tether.

Styling: I included one stylist to manage basic hair, makeup, and wardrobe needs for the staff and talent. The talent would be wearing a branded uniform which the client provided, so we didn’t need to do any wardrobe shopping.

Shoot Processing for Client Review: This covered the photographer’s time for the initial import, edit, color correction and upload of the entire shoot to an FTP for client review and final image selection.

Selects Processed for Reproduction: I included basic select processing as a lump sum based on 150/image in this case. This protects the fee in the event the client ultimately selects more or less than 12 images.

Casting and Talent: Since the portrait concept called for a relatively tight shoulder up shot of the talent, they agency was comfortable with a digital casting and reviewing recent comp cards to make their selection. The casting fee covered the photographer’s time to reach out to a couple of local talent agents to request current head shots and share them with the agency for review and selection. The talent fees, in this case, were quoted by the local talent agency. Though this is a very reasonable fee for the usage, we’re often able to negotiate slightly lower fees. The fact that this was for a pharmaceutical client put a little bit of a premium on the talent cost.

Mileage, Meals, and Miscellaneous: Finally, we estimated for miles, meals for the production at the on-site cafeteria, and a bit extra to cover any unanticipated miscellaneous costs.

Results: The photographer was awarded the project and luckily, both the client and agency were very easy to work with, and the facilities proved to be as manageable as we had hoped, all of which allowed the photographer to crank out the entire shot list in a normal 10-hour day.

If you have any questions, or if you need help estimating or producing a project, please give us a call at (610) 260-0200. We’re available to help with any and all pricing and negotiating needs—from small stock sales to large ad campaigns.

Pricing & Negotiating: Trade Ad Environmental Portraits

Jess Dudley, Wonderful Machine

Shoot Concept: Environmental portraits for trade ads

Licensing: Unlimited use of up to two images for two years

Location: On location in Denver

Shoot Days: One

Photographer: Portrait specialist based in the Southeast

Agency: N/A – Client direct

Client: A large hotel group

Here is the estimate:

Creative/Licensing: Earlier this year I helped to estimate a campaign for a large hotel group for one of our Southeast-based photographers. The concept was to highlight the client’s business services and corporate rewards programs by shooting an environmental portrait of an executive from another well-known brand that utilized the programs. The client secured the subject, and the subject secured the location (one of their very recognizable retail-storefronts). The client hoped to walk away with two portraits of the subject captured in slightly different setups within the location. One shot was an eyes-to-camera “hero” shot. The other was a secondary, more candid-feeling portrait (think captured moment while the subject assesses inventory or interacts with store staff).

Although the client required unlimited use of the two final selects, there was an inherent “trade advertising” limitation in the use. While I was mindful of the possibility that the ad could potentially be used in consumer-facing publications/platforms, the campaign was directed toward corporate travel departments & executives and, accordingly, would most likely be placed in trade publications. Though the intent was made clear, the client wasn’t willing to limit the licensing agreement to trade use only.

Additionally, the client requested two years of use for the images. Lately, I’ve tried to avoid anchoring licensing duration with the term “from first use” because it can be a bit too vague. It puts the onus on the photographer to chase down the client to determine when exactly the first insertion occurred (though some clients are good about sharing that info, others are trickier to pin down). Additionally, without more specific language, some clients may take a liberal interpretation of “first use” to mean first use of a given image, as opposed to the image set, effectively extending a given campaign (e.g. image one is used 6/16-6/18 and image two is used 1/17-1/19). To avoid these issues altogether, we’ve been using specific expiration dates, which will often include a bit of lead time for print production and insertion deadlines. So a shoot scheduled in early May, such as this, allowed for as many as six weeks of post and print production work (i.e a start date of June 30, 2016 and expiration date of June 30, 2018). It is possible the client could immediately insert one of the images in a web ad or elsewhere, but when pricing out durations in the 12+ month range, we feel the extent of the usage and clarity of the termination date outweigh the concern over early use.

After factoring in the intended use, duration of use, inherent limitations, the complexity of the shoot, nature of the campaign, variety of the imagery and the scale & reach of the client, we set the value for these images at 8,000 for the first, and 4,000 for the second. The value of the second image drops so significantly because it is a true variation of the first image that doesn’t drastically impact the core message or design on the campaign but still provides value.

Client Provisions: I was sure to note exactly what the client had committed to providing, including sourcing the location and subject, and securing the necessary releases.

Tech/Scout and Travel Days: I included one tech/scout day to walk through the storefront location with the creative team to determine compositions and block out the schedule. It was also particularly important in this case to determine appropriate staging areas, assess the availability of power options, overhead lighting control and store readiness as the product and store would feature prominently in the shots. Based on the flight schedules, we were able to fly in and scout on the same day, enabling us to estimate for one Tech/Scout day (including travel to the location) the day before the shoot and one return travel day the day following the shoot.

Producer and Production Assistant: I included a producer to manage all aspects of the production, from sourcing crew to booking travel to correspondence between the client and subject. I also added a PA to help with odds and ends throughout the production.

Assistants & Techs: I estimated for a first assistant to travel with the photographer and included a digital tech (with a workstation) & second assistant for the shoot day.

Equipment: I estimated one day of gear rental from a local rental house at 2000.00 for a medium format system, backup DSLR system, a handful of lenses, lighting and grip equipment. Our proposed itinerary would allow for our first assistant to pick up gear the afternoon of the tech/scout day and return it on the way to the airport the morning after the shoot.

Shoot Processing for Client Review: This covered the photographer’s time for the initial import, edit, color correction and upload of the entire shoot to an FTP for client review and final image selection.

Selects Processed for Reproduction: I included basic processing of “up to” two final selects as a lump sum (based on 150/image in this case), which protects the fee in the event the client ultimately selects fewer than two images (or more than two images, for that matter).

Styling: The subject would need stylists to manage wardrobe and hair & makeup needs for the shoot so I factored in a wardrobe stylist (including shopping and return days for the wardrobe stylist) and a budget for un-returnable wardrobe and small props like handbags, etc. (which would ultimately be offered up to the client, subject, or donated) as well as a hair and makeup stylist for the shoot day only.

Travel Expenses: I budgeted for airfare, lodging and car rentals for the traveling crew (Photographer, Producer and First Assistant). I was sure to consider parking, internet, baggage and car insurance costs as well.

Catering, Insurance, Miles, Meals, and Miscellaneous: To wrap everything up, I estimated for craft, breakfast and lunch catering at about 60.00/person, insurance costs to cover worker’s comp premiums (and a small portion of general liability, meals and miscellaneous costs for the traveling crew.

Results/Hindsight: The photographer was awarded the project, without negotiation, which meant we hit the budget on the nose, or that we left money on the table. Wonderful Machine managed the production and the client has since come back to the photographer and WM to produce and shoot additional versions of the same campaign.

If you have any questions, or if you need help estimating or producing a project, please give us a call at (610) 260-0200. We’re available to help with any and all pricing and negotiating needs—from small stock sales to large ad campaigns.

Expert Advice: LinkedIn

By Rachel Walburn, Wonderful Machine

An active social media effort should be part of every photographer’s overall marketing strategy. LinkedIn has some unique features that make it an essential part of that strategy. Namely, it’s the only platform that is strictly business to business, making it easy to find and connect with clients and for them to find you. While LinkedIn is ideal for creating connections, it is also an excellent way to cultivate relationships and promote your brand. We have some advice on not only how to make your profile stand out to get those connections you’d like, but also how to market your brand!

Expert Advice, LinkedIn, Wonderful Machine, Rachel Walburn, Photography, Photographer​​

photo by Saverio Truglia

CREATING A PROFILE

LinkedIn is an online resume allowing you to share your experience, skills, and interests. It’s primarily a professional platform, but there’s an opportunity for you to show off your unique personality as well.

To create a basic profile, LinkedIn will prompt you for your name, your job title, your location (probably your nearest big city), your industry (probably Photography), and your work history. We recommend inputting your first and last name and then entering your company name as your current job. After getting these basics squared away, we recommend customizing your profile to add in your personality.

You can start off by creating a custom URL. When you make your LinkedIn account, LinkedIn will assign you a URL based on your name plus some random numbers, like linkedin.com/in/joeblow-2334234. LinkedIn gives you the ability to edit that, so create text that matches up as closely as possible with your brand. So instead of linkedin.com/in/joeblow-2334234, it might be better to have it read linkedin.com/in/joeblow-photography. To change this, please see our lovely staff member Ken’s profile below. Detailed instructions describing the process are explained on LinkedIn’s help page.

Expert Advice, LinkedIn, Wonderful Machine, Rachel Walburn, Photography, Photographer

Your headline counts. Instead of writing “Photographer” or “Freelance Photographer,” make it specific. Try “Photographer Specializing in Corporate and Architecture Photography.” Quick changes like this can take you from one of many to one that’s above the rest. Potential clients want to know who and what they’re viewing quickly and if it’s the right fit for them, so it’s important that your profile is thoughtful and complete.

Expert Advice, LinkedIn, Wonderful Machine, Rachel Walburn, Photography, Photographer

Jordan Hollender makes a very clear and descriptive use of his headline by noting that his company HollenderX2 is not just a husband and wife photo team but a duo specializing in conceptual images and portraits.

Make sure your profile picture is of you, not a model you’ve photographed. Keep it professional and in line with the rest of your branding – preferably without a camera hiding your face!

Expert Advice, LinkedIn, Wonderful Machine, Rachel Walburn, Photography, Photographer

D. Scott Clark’s professional profile image on LinkedIn.

You can also brighten things up on your brand’s page by adding banners. If you’re a photographer, you can upload a picture or a series of images to help bring out your personality and make your profile unique.

Expert Advice, LinkedIn, Wonderful Machine, Rachel Walburn, Photography, Photographer

Vance Jacob’s LinkedIn banner showcases examples of some of his portraits.

Use your summary to share your background and tell your story. Be personable and speak directly to the reader. Engage them, so they’re interested in learning more about you. Treat this overview like an elevator pitch of who you are as a photographer. Keep it short and straightforward. LinkedIn allows you to include images, documents, and links throughout your page. You can post a direct URL to your website (or specific pages within your site), and you can include photos or video. Having a few examples of your work in your summary is an excellent way to add visuals to break up boxes of text and give clients a sample of your actual work!

Expert Advice, LinkedIn, Wonderful Machine, Rachel Walburn, Photography, Photographer

Vance Jacob’s LinkedIn summary. Vance elegantly breaks up his bio with thumbnail image links directly to sections of his website.

Include personal interests and hobbies, certifications, causes that you’re interested in and volunteer work you’ve done; even if it was years ago. It’s sometimes those details that make it easy for others to relate to you.

Expert Advice, LinkedIn, Wonderful Machine, Rachel Walburn, Photography, Photographer

Liz Nemeth mentions her volunteer work and interests in children and families on her LinkedIn. This information shows clients her personality and these causes are reflected in the subject matter of her photographs! Your volunteer work is a great way to emphasize your passions are show your depth beyond photographic skills.

NETWORKING: FINDING CLIENTS

By creating a detailed profile, you’ll be making it easy for clients and others in our industry to find you. LinkedIn also provides a number of tools to make it easy for you to find others and to cultivate relationships within our industry.

When you first create a profile on LinkedIn, you won’t have any connections. Start by sending a connection request to people you already know and who are likely to accept your connection. Past clients and photographers who you have a strong relationship with would be ideal people to add. With those connections, you’ll be able to send out a connection request to others who have their privacy settings set so that you must share a common connection before you can request them. With each connection you add (these are your 1st connections), your 2nd and 3rd connections will also grow. You can ask someone in your immediate network for an introduction to a 2nd or 3rd connection if you see a connection that has great potential. You will see this option on your toolbar on the right under another handy tool which shows people similar to the profile you are on:

Expert Advice, LinkedIn, Wonderful Machine, Rachel Walburn, Photography, Photographer

As your network expands, more people will see you and your searches will yield more results. Since LinkedIn uses this algorithm, we recommend connecting with clients in the industry who are going to hire you or introduce you to industry professionals that can help to advance your career. You want to only connect with photographers who can endorse or introduce you to a client.

Follow companies that interest you. Once you follow a company, you’ll receive updates including job opportunities and other news that it shares on your LinkedIn homepage.

To find clients you’d like to work with, look at the company profile page to see who the creative director, art director, photo editor, or marketing director is. Those will be the people that are most likely to hire photographers or be interested in photography and the ones you want to connect with.

RECOMMENDATIONS & ENDORSEMENTS

While Instagram, Facebook, and Twitter are great for building a following, showcasing your images, and casual interaction; clients may not be able to get a sense of what it will be like to work with you. LinkedIn serves as a recommendation letter. Users can easily endorse the skills and expertise you list on your page, and in turn, it’s an easy way to confirm what you can do. Even better, users you’ve worked with in the past can write a recommendation discussing their experience with you. Nothing is more valuable to a client than seeing that you’re professional, experienced and a pleasure to work with.

So, how do you get a recommendation? You can contact up to three connections at a time to ask them to recommend you. Try writing a thoughtful recommendation for some connections you had great experiences with. This feedback might inspire them to do the same! Recommendations double as a thoughtful way to say thank you and make an impression that will help you stay on someone’s mind. Not only will recommendations show up on your LinkedIn page, but they will also be visible on the page of the user who wrote it for you – allowing all of their connections to see you shine as well.

To request recommendations from a particular person: Go to their profile, click on the drop down menu under their name and select recommend. From here you can write a recommendation, or you can choose to Ask for a Recommendation.

Endorsements are great because you essentially get to select the skill areas you’d like to be endorsed it! Don’t forget to set up these skills on your page by simply clicking add skill and typing your areas of expertise.

Expert Advice, LinkedIn, Wonderful Machine, Rachel Walburn, Photography, Photographer

Christina Gandolfo’s LinkedIn.

LinkedIn is full of networking opportunities to help you find the right professionals. And like many other social media sites, you have access to it right at your fingertips through its mobile app making it easy to stay connected and active almost anywhere in the world. Think of LinkedIn just as you would Twitter, Instagram or Facebook in regards to posting content! On the homepage, you can use: Share an update, Upload a photo or Write an article to keep your audience posted on new work, features, tearsheets and pieces written on your work. These posts will show up directly in your connections newsfeeds, like Facebook, and the content will permanently live on your LinkedIn profile page.

Expert Advice, LinkedIn, Wonderful Machine, Rachel Walburn, Photography, Photographer

Justin Bastien’s LinkedIn posts live on his profile page permanently after being featured on his connections newsfeeds.

A free account offers all of the features above, and if you decide to upgrade, you’ll gain access to even more connections, have the ability to make more targeted searches and receive more information on who’s viewing your profile. You’ll receive a number of InMail messages– these allow you to directly contact people even if they aren’t in your network. There are a few different options available, and LinkedIn sometimes offers free trials to see if an upgrade is right for you.

Need help with your marketing? Give Rachel Walburn at Wonderful Machine a shout!