Pricing & Negotiating: Headshots For A Law Firm

By Craig Oppenheimer, Wonderful Machine

Concept: Headshots and environmental portraits of law firm partners

Licensing: Unlimited use of up to 20 images for 5 years

Photographer: Portraiture specialist in the Southeast

Client: Law Firm

Here is the estimate:

Fees: The client initially presented a project scope resembling a corporate lifestyle production with a seemingly endless shot list and a request for a one-day shoot (for what looked like a two-day shoot at a minimum). We had a discussion with the client, letting them know what we felt was feasible in a single day, and we were able to put a tighter box around the scope by just including portraits of their four main employees/partners in and around their office. It was at this time I asked about their budget, and we were told they had $10,000 to spend. This wasn’t a surprising budget, but I knew it would be a challenge to include appropriate fees/expenses across the board while capping the bottom line.

They had initially wanted 50 images, but given the budget, we limited that to 20 images and included a $6,000 fee, which happened to break down to $300/image. It felt light given the usage, but the straightforward nature of the newly defined project scope put downward pressure on the fee. Also, given all of the factors, the photographer was pleased with this amount. In addition to the creative/licensing fee, we also included $500 for a tech/scout day, so the photographer could see the location ahead of time and talk through logistics and creative approach with the client.

Crew: I included a first assistant to attend both the tech/scout day and the shoot day. I also included a digital tech who would double as a second assistant on the shoot day.

Equipment: This covered the photographer’s own equipment, and while I would have liked to charge more for the camera/lighting/grip he’d be bringing, we kept this expense to a minimum, given the budget.

Misc: I included $100 for any unforeseen expenses.

Postproduction: I included $300 for the photographer to provide the client a gallery of content to choose from, and then $100 per image to cover retouching for each of the 20 selects.

Feedback: The client demanded that they needed usage in perpetuity rather than be limited to five years. Typically, we would have gone back to them with an increased fee to accommodate that, but they essentially let us know it would be a deal breaker to increase the budget. The photographer was begrudgingly willing to simply include the perpetual usage to seal the deal.

Results: The photographer was awarded the project.


Have questions? Need help estimating or producing a project? Please reach out.

We’re available to help with any and all pricing and negotiating needs, from small stock sales to large ad campaigns.

The Best Way To Register Your Copyright

by Varun Ragupathi, Wonderful Machine

Yes, you own the actual copyright to your work when you create it, but you do not have the full protection of the law unless you register it. That one little [online form] from the copyright office will change your life.

This is how longtime director and photographer Michael Grecco sums up the process that ensures your photographs are protected. The first step is, of course, creating the imagery itself. But what’s also important is registering that work with the U.S. government’s copyright office to prevent outside parties from unjustly using your imagery. Your ability to defend yourself against an infringement depends on your timely registration of your copyright. Most photographers don’t realize that while they own the copyright to their photos the instant they’re made, it’s only by registering the copyright that they’re truly protected from infringement.

As with just about anything related to our government, the process by which you register your copyright is, to use Michael’s words, “deceptively complicated.” Across three detailed videos, Michael breaks down and simplifies the step-by-step guide to protecting your work, covering the “why” as well as the “how” regarding this vital action. Let’s take some time to highlight the key points of each video, all of which can be found below.

PART ONE: BACKGROUND INFORMATION ON COPYRIGHT REGISTRATION

As a primer of sorts for this rather involved topic, Michael takes the time to explain the definition and importance of copyright registration. Here are some of the big takeaways to keep in mind:

  • Why the difference between having and not having your work copyrighted could add up to hundreds of thousands of dollars in lost revenue.
  • Why you can earn up to $150,000 — plus legal fees — per image if you register your copyright before someone tries to steal it.
  • Why published and unpublished work needs to be registered separately and differently — and why every image registered at one time needs to come from the same year.
  • The number of images you can copyright per registration, and how much time you have between publication and registration to receive full protection for your published work.
  • How to determine if your work can be considered “published.”

PART TWO: REGISTERING YOUR UNPUBLISHED WORK ONLINE

In the second of his three videos, Michael sits down and goes through the actual process of registering your property on the U.S. Copyright Office’s website. This is where we get into the nitty-gritty of ensuring your work is protected by the law. The biggest thing to note here, other than how to navigate the online form, is that organized archiving is key. Make sure that all your files are grouped logically and labelled consistently — after all, you may very well be uploading hundreds of images at once, so it’s imperative you know where they are and why they go together.

PART THREE: REGISTERING YOUR PUBLISHED WORK ONLINE

While the process for registering your published work is quite similar to what you’d do for unpublished imagery, there are a few extra steps you need to take. Whereas unpublished work can be dated by the time it was created, published images must be labeled by when they were, well, published. If you did a shoot for a magazine in, say, July of 2019 but the issue featuring your work didn’t run until October 2019, you need to date your images with the latter month and year (the day of publication is irrelevant). Take a look at the video above to see the other differences between registering unpublished and published work; Michael’s also got some tips on how to best keep track of the images you upload to the copyright office’s website.

And that about covers one of the most important and necessary aspects of protecting your intellectual property. You busted your butt to not only create images, but also to earn a living from them, so complete this process regularly to ensure you get fully compensated for your work. Hopefully this seemingly daunting task becomes a little less scary once you hear from Michael!

For more information on the subject, check out Honore Brown’s how-to guide and chat with photographers on the subject.

Need help registering your copyright? Send Wonderful Machine an email with any questions or concerns!

Pricing & Negotiating: Celebrity Shoot For Alcohol Company

Concept: Environmental portraits of a celebrity

Licensing: Unlimited use of all images captured for two years from first use

Photographer: Portraiture specialist

Client: Large alcohol brand

Here is the estimate (click to enlarge):


Fees: While the portraits would be rather straightforward, the celebrity talent required a photographer who had experience working with high-profile subjects and — due to said talent’s busy schedule — the ability to capture strong content in a short amount of time. That put upward pressure on the fee, and I felt that a creative fee alone was worth $4,000.

For the licensing, even though the client requested unlimited use, they were most likely to place the content in regional advertisements — primarily on in-store displays. I felt $6,500 was appropriate for one year of usage, then added 50% to account for a second year, bringing me to $9,750. I arrived at a $13,750 fee by combining the $4,000 creative fee and the $9,750 licensing fee. On top of that, I added a $1,500 fee for the photographer to attend a tech/scout day on location.

Crew: Given the nature of the project, I included a producer and PA to help coordinate the day and help hire/manage the rest of the crew and styling team. We added a first assistant (who would also accompany the photographer on the tech/scout day), second assistant, and a digital tech as well. The digitech’s rate included a $500 fee and $1,000 for a workstation and, overall, the rates were appropriate for the given market.

Styling: We included a hair/makeup stylist and a wardrobe stylist, as requested by the client. The wardrobe stylist would just be preparing clothing provided by the talent, so no shopping/return days were needed.

Equipment: We included $1,500 for cameras/grip/lighting and a modest fee to cover production elements like tables, chairs, etc.

Health and Safety: We included two days for a COVID compliance officer (which covered the tech/scout day and the shoot day), plus a few hundred dollars for PPE.

Meals: This rate was $75 per person on the day of the shoot.

Misc.: The venue was a bit out of town, so this fee covered mileage, parking, some additional meals, and bit of overhead for any unforeseen expenses that might arise.

Postproduction: We included $500 for the photographer to perform basic color correction and provide a gallery of his favorite shots. We also added $350 for a hard drive to deliver all of the images, as the client would handle retouching.

Results: The photographer was awarded the project, and the client ended up expanding the usage to include an additional year for one image for a fee of $3,750.

If you have any questions — or if you need help estimating or producing a project — please reach out. We’re available to help with any and all pricing and negotiating needs, from small stock sales to large ad campaigns.

Pricing & Negotiating: Human Interest Video For A Restaurant

By Craig Oppenheimer, Wonderful Machine

Concept: Testimonial video of a real customer and employees

Licensing: Internal and Web Collateral use of all content captured in perpetuity

Director: Lifestyle and hospitality specialist

Client: Large restaurant chain

Here’s the estimate (click to enlarge):

Expert Advice: Photographer Scams

Varun Raghupathi, Wonderful Machine

Online scams are nothing new. These days, as schemes get more and more elaborate, it seems that anyone can fall victim, and photographers are no exception.

In recent weeks, several of our members received emails containing what looked like an interesting assignment. The sender, purportedly an editor named “Jack Moss” from anothermag.com, found the photographers on Wonderful Machine and asked them to produce a fashion shoot. But some details did not quite add up and, one after the other, the photographers started forwarding these emails to us.

We are sharing all the details here to help photographers stay alert and protect themselves against similar scams in the future. This is what the inital email sent to the photographers looked like, provided by Francis Hills:

EA Photographer Scam Jack Moss Fake Email Drop Shadow
The scam email sent to Francis Hills. The scammer sent this email to at least four WM member photographers.

Fake assignments

“I’m Jack, a beauty, fashion and lifestyle writer and editor at anothermag.com, a subsidiary of Dazed media and Dazed digital,” read the initial email. “I saw your profile on wonderfulmachine.com which led me to some of your work online and after going through your portfolio, I would like to learn more about your services.”

Jack, not exactly the world’s foremost expert on comma usage, was inviting his prospects to “concept, shoot, and produce 36 images, featuring 3 models.” The scammer also mentioned that “you will be required to work with a company recommended hair/makeup artist and a wardrobe stylist, and bring a smart, fun approach and distinct style.” Here’s part of the PDF he sent to the photographers:

EA Photographer Scam AnOther Mag Fake PDF
Part of the fake job description PDF sent by the scammer to photographers.

The scammer offered $3,500 in photographer compensation — $1,500 upfront and $2,000 after the shoot — while earmarking $9,500 for the total shoot budget (to include talent fees). The client would supply the wardrobe. Additionally, the photographer would hold the full image rights and said images would be posted as editorial content on AnOther Mag’s website for a year.

Seems legit, right? Well, as we started reading carefully, several red flags appeared:

  • The email came from a Gmail address. If it were a real assignment, it would likely come from a Dazed or AnOther Mag email address.
  • The real Jack Moss is not only a Digital Features Editor for AnOther Magazine, he holds the same role for Another Man Magazine. The email signature for the fake Jack Moss did not mention this.
  • The project description, which was attached to the email, was not on Dazed or AnOther Mag letterhead. In fact, the PDF itself is quite plain, which usually isn’t the case when a real client comes calling.
  • There were several typos and syntax errors in both the email and the project description. A fair number of scammers are not from the U.S. and therefore struggle with English. Adam Lerner, one of the targeted photographers, mentioned that things felt “off” the whole time. To cover his bases, he set up a chat with the client to discuss the assignment and received a call out of East Hampton, New York from the number 631-731-6280.
    • During the talk, Adam noted, “he had answers to all my questions despite being completely flat in his demeanor. No enthusiasm. And a very thick accent that sounded West African. I didn’t really get too bothered by that because people in fashion tend to be from everywhere, but I also wasn’t completely re-assured to the legitimacy of this shoot after the call.” So, while the accent and grammatical errors might not be enough on their own to prove things aren’t up to snuff, they can add up to a scam if combined with other red flags, like the ones discussed here. 

In the 12 years Wonderful Machine has been in business, this is the 4th or 5th time this has happened. After doing some research, we learned that fake assignments are some of the most common scams used against creatives. In this case — as with most others — our members were cautious and did not choose to accept the offer. What would happen if they took the gig?

If accounts of previous such scams can serve as an indication, the photographer would most likely receive a check from the “client.” This check would include the payment for their fee, as well as for the talent. The sender would then ask the photographer to deposit the check into their account and promptly send a payment to the talent agency (or another service needed to prepare for the shoot). If the photographer followed these directions, their bank would initially accept the original check, after which the photographer would dutifully send their check to the talent agency. So far, so good.

Except the agency would not be legitimate — it would be associated with the scammer. In the meantime, the photographer’s bank would discover the cashier check was also fake and it would bounce. By that time, the money has already been sent, and the editor is nowhere in sight. Goodbye fee! Goodbye contract! Goodbye gig! Here’s what that check would look like, via Jon Morgan:

EA Photographer Scam Jon Morgan Fake Check

As you can see, the scammer sent Jon $7,500 to cover his upfront fee ($1,500) and the talent compensation ($6,000). The final $2,000 would be given to Jon after the work was done, bringing the total to the $9,500 mentioned in the brief.

How to protect yourself

It’s only natural for freelance photographers who are trying to market their business to share information about themselves and their work with as many people as possible. This, of course, includes strangers.

The internet provides countless legitimate business opportunities, but it’s important to be aware of the risks. Here are some precautions that can help photographers protect themselves against scams:

  • When considering assignments from people with whom you have never worked before, ask a lot of questions. Where is the shoot taking place? When? Who else is working on it? If you do not receive sufficient information, it should raise a flag. And if you do? Verify that information using Google and LinkedIn.
  • Be skeptical of the example images used in mood boads. Akilah Townsend, another photographer who got an email from “Jack,” figured out it was a scam in part because “the images he used weren’t tasteful, in my opinion. They didn’t look like what AnOther Mag would produce.” While subpar imagery might not be strong enough evidence on its own, it definitely counts as a red flag. Akilah continued to follow up, noting the gmail address was weird and doing some research online to get to the bottom of things.
    • She said the final nail in the coffin was when the scammer “signed an email with a different editor’s name” — Akilah googled that name and found out that person, Ethan D’spain, was at a different magazine. “My agent asked who the other person was and [“Jack”] claimed it was his friend helping with the project,” Akilah said. “Too many fishy things.” Here’s that second email the scammer sent to Akilah and her agent, Candace. Note the misspelling of “D’spain:”
EA Photographer Scam Fake Follow Up Email
A follow up email sent to Akilah by the scammer, who mistakenly signed off with a different name than he originally used.
  • If the potential scammer is using the name of a real creative, email that person to confirm it’s not them. For example, Francis Hills reached out to the actual Jack Moss, who quickly replied by saying he did not send the initial email.
  • Read everything carefully, paying attention to grammar, spelling, punctuation.
  • If something looks weird, paste fragments into Google and see whether anyone else has received a similar message. Scammers are too busy to write unique letters to each individual they are attempting to scam. Yes, they do copy and paste — especially if English is not their first language! So, check if anybody shared anything on a blog or some online forum. Are there any company reviews coming up?
  • Call the phone numbers they provide and try to talk to people. If the phone number doesn’t seem right, call the main phone number for that company and ask for that person. If they do not answer, or insist on communicating via e-mail only, it definitely is a warning sign as well. You can also vet names and numbers by visiting Unknown Phoneor ICANN lookup.
  • If you suspect you are a target, ignore the e-mail and do not engage the individual. Instead, report the case to the Federal Trade Commission by calling their hotline 877-FTC-HELP (877-382-4357) or filing an online complaint on their website. You can also visit the Federal Bureau of Investigation’s Internet Fraud Complaint Center.

Last but not least, share your story – write on your blog, post on social media, talk to other photographers. There is no better way to combat scammers than to publicize what they do and make other people aware of their tricks. The reason we were able to publish this piece is because of how proactive our members were in getting this scam on our radar.

To that end, thank you to Francis Hills, Adam Lerner, Jon Morgan, and Akilah Townsend for telling us about this scam and how they figured out it wasn’t a real shoot. While it’s always a letdown to realize a potential job is actually a scam, it sure beats having your bank account information fall into the wrong hands!

To learn more about photographer scams, read:

Think you’ve been a victim of a scam? Please contact Wonderful Machine by emailing us or calling us at 610 260 0200.

Pricing & Negotiating: Farmer Portraits for Financial Services Company

Craig Oppenheimer, Wonderful Machine

Concept: Environmental portraits of farmers at work

Licensing: Print and web collateral use of up to 12 images for three years

Photographer: Industrial and portraiture specialist

Agency: Medium, based in the South

Client: Financial services company

Here is the estimate:

Redacted estimate for farmer portrait photoshoot.

Creative/Licensing Fees: The agency planned to line up customers of the client who were farmers, and photograph them at two different farms over two shoot days. While we weren’t sure of exactly where the farms would be, we found out that one of them would likely be within driving distance of the photographer, while the other might require a quick flight and some travel. We were told that they needed six images from each farm, and they requested collateral use for three years. Based on a conversation with the agency, it was clear that these would likely end up being used for trade shows, social media, and possibly for their website. I started by coming up with a tiered pricing model based on one-year usage, with the first image being worth $1,500, the second image worth $750, and images three through six worth $500 each. That totaled $4,250, which I then doubled to reach a three-year price, and then doubled again to account for both sets of images/farms, landing at $17,000. That broke down to $8,500/day or just over $1,400/image, and based on the limited use, along with our understanding that they might have a tight budget for the project, we decided to shave the fee down to $13,000. The agency had also asked for a licensing option to include unlimited perpetual use, and we decided to base that additional cost on the $17,000 that we initially came up with, which would total $30,000 if they went for that option.

Travel/Scout and Pre-Production Days: We detailed a schedule in the job description that combined all of the travel, scouting and shooting into a four day window, as the photographer wanted to take advantage of dusk and morning shoot times while minimizing the length of the project. In total, we included two days to account specifically for travel and added one day to account for the pre-production work that the photographer would tackle ahead of time. This included lining up his assistant, booking transportation, and communicating with the agency about the project before the shoot.

Assistant/Digital Tech Day(s): The photographer and the agency wanted to keep a minimal footprint on location, so we combined the roles of assistant and tech into one. We included all four days of traveling and shooting for this person’s rate.

Equipment: This included the photographer’s cameras, lenses, grip, and lighting equipment, plus his laptop for the assistant/tech to use on site.

Airfare, Lodging, Car Rental: Since we didn’t know exactly where each shoot would take place, it was hard to estimate travel costs, and the agency asked that we just put in some placeholders while they figured out the logistics. I based the numbers on $500/flight, $250/night for lodging, and $350/shoot for a van rental.

Mileage, Parking, Meals, Misc.: Again, since locations were a bit unknown, it was hard to be accurate, and I included $500 per assignment/farm to account for these items. Roughly, I anticipated about $300 in meals/per diems, and $200 for other miscellaneous expenses.

First Edit for Client Review: This included the photographer’s time to do an initial edit on all of the content and prepare a web gallery for the agency to review.

Color Correction, File Cleanup and Delivery of 12 Selects by FTP: We based this on $100/image for the minimal post-production work.

Results: The photographer was awarded the project.

If you have any questions, or if you need help estimating or producing a project, please give us a call at 1 610 260 0200 or reach out. We’re available to help with any and all pricing and negotiating needs—from small stock sales to large ad campaigns.

Pricing & Negotiating: A Corporate Lifestyle Project With an Expanding Scope

Craig Oppenheimer, Wonderful Machine

Concept: Corporate lifestyle images of employees at work

Licensing: Collateral use of 30 images in perpetuity

Photographer: Portraiture specialist

Agency: Mid-sized, based in the Midwest

Client: Large law firm

Here is the estimate:

Corporate lifestyle photoshoot initial estimate.

Creative/Licensing Fees: The project started like many others I’ve seen. A law firm needed corporate lifestyle images of their employees at work within their offices. Based on the brief we received, we decided that two shoot days would be necessary to check off all the boxes and to make sure that all the key employees were available to participate. They hoped to license 30 final images, primarily for use on their website and for other collateral purposes. Based on my experience on other similar projects, I anticipated that a fee somewhere between 4-5k/day, or a few hundred dollars per image would be appropriate, despite the perpetual duration requested. I decided to include $4,500/day, or $300/image, to arrive at a creative/licensing fee of $9,000.

Scout/Pre-Production Days: I included $1,000 to account for the photographer’s time to look at the location prior to the shoot, and discuss the project with the agency/client.

Assistants: We wanted to keep a relatively small footprint, and we included one assistant who would play double duty as a digital tech, as well as a second assistant to lend an extra pair of hands for both shoot days.

Hair/Makeup Stylist: We anticipated the need for light hair/makeup styling, and included a stylist for both days.

Equipment: This included the photographer’s camera, grip, and lighting equipment for both days.

Mileage, Parking, Meals, Misc.: We anticipated $35 per person per day for the crew for meals, and included approximately $100/day for mileage, parking, and unforeseen expenses that might arise.

First Edit for Client Review: This included the photographer’s time to do an initial edit through everything captured, and provide a gallery of content for the client to review.

Color Correction, File Cleanup, and Delivery of 30 Selects by FTP: We based this on $50/image for the light post-production that the photographer would perform on the selected images.

Feedback: The agency was receptive to the fees/expenses and told us that there was a chance this project could potentially grow in scope, but they needed to continue the conversation with their client. About two months later, they finally got back in touch to inform us that they wanted to expand the project to include five cities. Additionally, rather than corporate lifestyle images, the creative scope shifted to focus more on environmental portraits of individual employees, and there were 353 employees collectively in each of the five different cities/offices. While it wasn’t completely dialed in, we acquired a rough breakdown of approximately how many people were in each office and developed a plan for ten shoot days. Five days would be at a location local to the photographer, and the rest of the shoot days would be at a mix of locations, a few of which required a bit of travel.

Here was the revised estimate we sent:

Second estimate for corporate lifestyle photoshoot.

We included a breakdown of subjects in each city along with an itinerary to ensure we were on the same page with the agency regarding the approach for the project. Since the scope changed to individual portraits, I thought that each image might be a bit less valuable than evergreen corporate lifestyle shots, and there was less of a chance they’d use a portrait of a lower-level employee as the face of any larger marketing campaigns. I decided to go with $100/image totaling $35,300, which also broke down to just over $3,500/day, and I felt this was reasonable given the additional fees the photographer would make for their travel days, equipment and post-production time.

For the crew, I broke out separate prices for travel days and shoot days for the first assistant/digital tech, who would be traveling with the photographer. We anticipated hiring local second assistants in each market, and while the plan was the same for the hair/makeup stylist, we included a slightly higher rate for them for a shoot in a larger market that would demand a higher fee for such a role. We kept equipment charges modest compared to the first estimate since the photographer owned his gear, and used Kayak.com to estimate travel expenses. For post-production, we brought the per image fee down from $50 to $25 for the color correction and file cleanup.

After reviewing the estimate, the agency let us know that they wanted to add back in the corporate lifestyle shots, along with some group photos of staff and detail shots of the office environments as well. However, they only wanted to do this at their headquarters where most of their staff was, and focus solely on the individual portraits at the other locations. We submitted the following revised estimate:

Third estimate for corporate lifestyle photoshoot.

In order to accomplish the new project scope, we felt that we would need two additional days at their headquarters, which was the location local to the photographer. Additionally, we needed to account for 24 additional images. While I discussed pushing the fee higher with the photographer, I also wanted to stick around the $3,500/day mark even though I felt the value of these additional 24 images was higher than the individual headshots. We also wanted to include a slight discount in return for a commitment to hiring the photographer for so many days. Ultimately, we landed on $42,500 as a creative/licensing fee, which was based on a candid conversation with our agency contact on what would be palatable to the client.

Additionally, we were asked to remove the hair/makeup styling, and were informed that they had hoped for us to stay around an 80k bottom line. We removed the styling, dropped equipment down a bit, and came down even further on the post-production on a per-image basis (while still including what we felt was appropriate overall for the time dedicated to retouching).

The project was awarded, and the shoot went off without a hitch.

If you have any questions, or if you need help estimating or producing a project, please give us a call at 610.260.0200 or reach out. We’re available to help with any and all pricing and negotiating needs—from small stock sales to large ad campaigns.

Pricing & Negotiating: Architectural and Still Life Images for Grocery Store

Craig Oppenheimer, Wonderful Machine

Concept: Still life images of produce, architectural images, and group portraits of employees

Licensing: Unlimited use of up to 83 images in perpetuity

Photographer: Food and portrait specialist

Agency: Small, based in the Northeast

Client: Grocery store and produce distributor

Here is the estimate:

Image of the first estimate for grocer store client.

Creative/Licensing Fees: The project had four components consisting of 1) still life images of food items against a solid background, 2) interior architectural images, 3) exterior aerial architectural images, and 4) environmental group portraits of employees, which would be captured over two days at two facilities/markets. Overall, they were hoping to end up with 50 product shots, 20 exterior architectural images, 7 aerial exterior architectural images, and 6 group shots, and they requested unlimited use of these images in perpetuity. The client only had one major market for customers in which they’d be advertising, and despite the request for unlimited use, the images were most likely to be used for collateral purposes. As much as I’d prefer to come up with a tiered pricing model, I had a feeling that based on previous projects with similar clients, we’d be looking at a couple of hundred dollars per image if we were lucky. I initially thought that a fee somewhere between $6-8k per day would be appropriate given the limited exposure. While I first suggested a creative/licensing fee of $16,000 to the photographer, we decided to come down slightly to $14,000, which we thought would be palatable on both ends.

Tech/Scout and Pre-Production Days: We anticipated that the photographer would scout both locations prior to the shoot on a single day. Also, I included a pre-pro day to account for the photographer’s time to help line up the crew and correspond with the agency about the details/logistics.

Assistant: The photographer wanted a lean crew to be as nimble as possible, especially because we anticipated working in a tight environment. We therefore included just one assistant for both shoot days.

Food Styling: We included a stylist for two days to account for one prep day and one shoot day, as all of the food images would be captured on just one of the two days, and we included an assistant for the stylist on the single shoot day as well. The client told us that they would provide all of the food items, and even though the stylist wouldn’t have to shop for food, their prep day accounted for product intake and organization.

Drone Operator: The photographer planned to outsource the aerial exterior architectural images to a drone operator, and they would capture the content on just one of the two shoot days. We included $1,500, which we anticipated would cover the operator and their equipment.

Equipment: I included $1,000/day to cover basic camera, lighting, and grip equipment, all owned by the photographer.

Mileage, Parking, Misc: I included $250/day for miscellaneous expenses that might arise, mainly as a buffer to account for unforeseen expenses.

First Edit for Client Review: This was based on $500/day and included the photographer’s time to batch edit all of the content and create web galleries for the client to review.

Color Correction, File Cleanup, and Delivery: I typically include at least $50-$100/image for basic post-processing, but since we wanted to keep the expenses to a minimum, we went with $25/image for the light post-production work. Overall, that totaled just over $2k, and I felt this was reasonable for the photographer’s time.

Feedback: We were asked to separate the project into two different proposals while making a few updates. First, they reduced the number of still life product shots from 50 to 25. Also, rather than shooting still life images of the products on location, they were interested in capturing that content at the photographer’s studio. This was a direction that the photographer suggested and hoped they would want to go in, and she was willing to integrate a discount into her fee and charge a very modest studio/equipment fee to steer them this way. Additionally, they would be bringing all of the prepped and organized products to the studio, so a food stylist would not need a prep day. As for the architectural images, they were willing to do without the drone content, and overall they were hoping we could find ways to come down collectively. We accomplished that by dropping the photographer’s fee a bit in consideration of the reduced shot count and by making a few tweaks to the expenses. Here were the estimates:

Second estimate for grocery store client.

Third estimate for grocery store client.

Results: The photographer was awarded the project.

If you have any questions or if you need help estimating or producing a project, please give us a call at 1 610 260 0200 or reach out. We’re available to help with any pricing & negotiating needs—from small stock sales to large ad campaigns.

Pricing & Negotiating: Product Interaction Shots for Beverage Brand

Craig Oppenheimer, Wonderful Machine

Concept: Professional talent interacting with various beverages in a residential property

Licensing: Collateral use of up to five images for one year

Photographer: Food/beverage and portraiture specialist

Agency: Mid-sized, PR-oriented, based in the Northeast

Client: Beverage brand

Here is the estimate:

Creative/Licensing Fees: We learned early on that the goal of this project was primarily to create content for social media, and there was also the possibility of the images living on the client’s website and being used for other collateral purposes. They only needed five shots and were willing to limit the usage duration to one year. These restrictions put downward pressure on the fee, as did the photographer’s limited experience working on commercial productions. I felt that each image was worth $500-$750, and on top of that I wanted to add $2-3k for the photographer’s creative fee. I ultimately decided that $5,000 was appropriate for a combined creative/licensing fee given the factors.

Photographer Scout Day: I included one day for the photographer to go see the location and do a walkthrough with the team. Typically I’d include a fee closer to $1,000, but I had a feeling the budget would be tight on this project, and the photographer was willing to go with a $500 fee for this.

Assistants: The first assistant would double as the photographer’s digital tech, and we included a second assistant as well for the one shoot day.

Producer: I included five days for a producer to help pull the project together and handle all bookings and logistical elements.

Hair/Makeup Stylist: I included one stylist to help prep the five talent we anticipated booking.

Wardrobe/Prop Styling: While I often break out these roles, I felt that given the minimal number of talent, a stylist could help arrange both of these elements, depending on the creative direction. I included appropriate shopping and return time for one stylist along with an assistant. I also included $500 per talent for wardrobe, and based on a conversation with the art producer at the agency I marked props as TBD which would be dependent on the final creative direction and location provisions.

Location Scouting and Location Fees: I included three days for a scout to help find a location and to be the liaison to the homeowner on the shoot, and I marked the location fee at $3,500. Additionally, I included $500 to cover floor protection and cleaning supplies.

Casting and Talent: As a cost-saving measure, we’d cast from cards rather than hold a live casting. Oftentimes I’d charge $500-$1,000 to handle this process, but we waived it and integrated the work into the producer’s time. I included $1,800 per talent based on a rate of $1,500+20% agency fee.

Equipment: This covered the photographer’s camera bodies, lenses, lighting, and grip equipment.

Catering: This was based on $65 per person for a light breakfast and lunch.

Production RV: I marked this as TBD, as it’s nice to have for a production like this, but the location could also serve as a staging area. We planned to discuss the potential need or lack thereof after we had a sense of what the location options were.

Post Production: I included $300 for the photographer to do an initial edit and provide a gallery of content for the agency/client to consider, and $100 per image for basic color correction, file cleanup, and delivery.

Mileage, Parking, Additional Meals, Misc.: I included $500 to cover transportation and miscellaneous unforeseen expenses that might arise during the production.

Feedback: After submitting the estimate, we were told that they had a $25k budget, and we were asked to revise based on this. Fortunately, the agency was willing to handle location scouting as well as retouching, and we compiled a revised estimate based on this. In addition to addressing those items, we also marked the scout day for the photographer as TBD and reduced a day for the producer. While we couldn’t quite get down to $25k, we felt that dropping it to under $30k would still be in the ballpark. Here was the revised estimate:

Results: The photographer was awarded the project. During the pre-pro process, the agency requested two additional talent to match an updated shot list, which impacted talent fees, wardrobe costs, catering, and a few other misc. expenses. Additionally, after the agency chose a location and had a conversation with the prop stylist, they approved additional shopping days and prop costs. In total, they approved nearly $10k of overages.

If you have any questions, or if you need help estimating or producing a project, please give us a call at 610.260.0200 or reach out. We’re available to help with any pricing and negotiating needs, from small stock sales to large ad campaigns.

Pricing & Negotiating: Portraits for a Fashion Accessory Brand

Craig Oppenheimer, Wonderful Machine

Concept: 6 subjects photographed against a solid background wearing fashion accessories                                                                                          

Licensing: Unlimited use of 12 images for 6 months

Photographer: Portraiture specialist on the East Coast

Client: A fashion accessory brand                                                                       

Here is the estimate:

Pricing and Negotiating Example of a Contract by Executive Producer Craig Oppenheimer at Wonderful Machine

Creative/Licensing Fees: The client asked the photographer to bid on a project for the brand’s new campaign, despite having little to no creative brief. The client saw a picture they liked in the photographer’s portfolio, and wanted to accomplish a similar aesthetic while integrating their product. We knew that they envisioned photographing 3 men and 3 women, all in a similar setup against a solid background, and they hoped to walk away with 2 images for each subject, totaling 12 final shots.

Initially, the usage was described to us as primarily being focused on social media, placement on their website, limited print advertisements and a mix of other guerilla style postings out-of-home, all for 6 months. When I discussed the usage with the client, it became clear that they wanted unlimited use during this time frame, despite the limited intended use they described. On one hand, the usage did seem quite limited, especially in duration, but on the other hand, the prominent brand would likely take out ads in high profile publications, and would likely pay a lot for their ad buy. Additionally, downward pressure was put on the fee due to the photographer’s limited experience working with such a brand, his eagerness to collaborate, the simple nature of the project, and the likelihood that only one or two images might see the light of day in advertisements, as most of the images would likely just end up on their website and on social media for a short duration.

After weighing all the factors, and based on the client’s intended use, I initially priced each of the first 6 images at $1,500 each, and then each of the additional 6 images (the second portrait for each subject) at $750 each, which brought me to $13,500.  My gut instinct based on other similar projects was that a fee between $10k-$15k would be appropriate for the day, and based on this experience and the eagerness of the photographer to get the job, we ended up going with $12,000, which broke down to $1,000/image if you look at it that way.

Travel and Pre-Production Day(s): The shoot would take place across the country, and the photographer would need a full travel day to fly there, and a full travel day to fly back. I also included one pre-production day for the photographer to book travel, wrangle crew and go through the paces with the client prior to the shoot. Typically I’d include a producer to help with these tasks and to handle the coordination of the entire project, but the client planned to coordinate many of the elements for this project, and the photographers was comfortable with just 1 day of prep to handle his tasks.

Assistant and Digital Tech Day(s): The photographer would be bringing an assistant with him, and hiring another one locally. I’d typically anticipate that the traveling assistant would be the “first assistant” and the local would most likely be the “second assistant”, but we flipped that in this case, as the photographer’s traveling assistant gave him a favorable rate for the three days out of town. We included one day for the digital tech, anticipating $500 for their day, plus another $500 for a basic workstation.

Hair/Makeup Stylist and Assistant Day(s): The client said that they had a few people in mind for hair/makeup styling who they planned to hire directly, but asked us to provide a sense of cost if they wanted the photographer to handle this. So, we therefore detailed TBD prices that didn’t impact the bottom line.

Studio Rental: This was based on feedback from a few local studios that we contacted to discuss rates and availabilities.

Equipment: While the photographer would be traveling with a bit of gear, he’d still need to rent a decent amount upon arrival, and this rate was primarily based on quotes received from the studios to provide such equipment.

Airfare, Lodging, Car Rental: I used Kayak.com to price appropriate travel expenses for the photographer and his assistant.

Parking, Per Diems, Misc.: This included $60/day/person as a per diem for the photographer and his assistant while traveling, plus $50/day in miscellaneous and unforeseen expenses.

First Edit for Client Review:  This covered the time it would take for the photographer to do an initial pass on the images, and provide the client with a gallery of images to consider

Retouching: This was based on a post processing rate of $150/hour, assuming two hours per image for each of the 12 images.

Insurance: We included this expense to help the photographer increase and maintain an appropriate policy.

Results: The client asked for two revisions. First, they decided to put hair/makeup responsibilities on the photographer, and asked that we send a revised estimate including those expenses, which was not a problem at all. Second, they asked if they could get 1 year usage for the 6 month price we quoted. I typically don’t recommend giving up something for nothing in return, but based on my previous experience with similar projects/budgets, and given how eager the photographer was to get the project, we decided to accept their offer. We submitted a revised estimate, and the photographer was awarded the project.

A few days later we were told that the client might want to add an additional day to the production, to capture a few additional shots with different talent, and with a slightly different background/setup. Specifically, they hoped to capture 3 subjects, with this additional day yielding 10 more images. Initially we were told that they only had $13,000 for this additional day, including all associated fees/expenses.

After calculating some rough numbers, I knew we weren’t going to be able to hit that, so I gave them a ring to negotiate. I learned that they could limit the usage to Web Collateral use and placement in up to 10 window displays of 3rd party retailers. This was a big jump down from the Unlimited use we were previously granting them. With this in mind, we submitted the following estimate:

Pricing and Negotiating Example of a Contract by Executive Producer Craig Oppenheimer at Wonderful Machine

We landed on $6,000 for this additional day/usage which was appropriate considering all of the factors. We also detailed the associated expenses with the additional day. We removed the first assistant (while essentially marking it as TBD) since the photographer didn’t feel they’d be needed on the second day consider the lighting setup would be similar to the first day, and his second assistant and tech could lend a hand as a cost savings measure. We increased equipment a bit for this additional day to account for a specific background the client wanted to procure, and included appropriate travel expenses in addition to more post processing time.

The overage for the additional day was approved, and the photographer quickly launched into pre-production to line everything up.

If you have any questions, or if you need help estimating or producing a project, please give us a call at 610.260.0200 or reach out. We’re available to help with any and all pricing and negotiating needs—from small stock sales to large ad campaigns.

Pricing & Negotiating: Architectural Images for International Hotel Chain

Craig Oppenheimer, Wonderful Machine

Concept: Interior and exterior architectural images of seven hotel properties

Licensing: Web Collateral and Web Advertising use of up to 56 images in perpetuity

Photographer: Architectural specialist

Agency: Medium in size, based in the Northeast

Client: A hotel brand part of a larger international hospitality conglomerate

Here is the estimate:

Estimate for Architectural Images for International Hotel Chain

Creative/Licensing Fees: When the project first landed on my desk, it was similar to a lot of hospitality projects in that the brand wanted a mix of images showcasing everything their hotels have to offer. The creative brief initially encompassed architectural images, lifestyle shots, food, amenities, and more. In my experience, many agencies that propose similar shoots are typically biting off more than they can chew, and their budgets typically don’t align with reality. After learning more about the project and discussing what it would take to accomplish a production of that scale in multiple locations, I was ultimately happy to hear that they decided to focus the efforts of this particular project on just acquiring architectural images, and putting the lifestyle shots on hold. That being said, they had seven different properties, three of which were in foreign countries, and they had a very specific style of black and white photography that they hoped to achieve.

In discussing what was feasible in one shoot day, we landed on eight shots per hotel as a reasonable deliverable. They were willing to limit the usage to web advertising and web collateral use (mostly their website and social media), although they did request perpetual use. On one hand, I wanted to start around a few thousand dollars per image, however I also knew that the photographer would be up against other architectural photographers (both domestic and abroad), and we wanted to make it appealing for them to hire one photographer, rather than several. Additionally, it was likely that they’d use just one or two of the images in a more robust way on their website, and many of the shots would ultimately just fall to social media. While the parent company of the hotel chain was one of the largest in the industry, this particular hotel chain was a smaller brand in their portfolio, and I had a sense they might not have what we wanted in terms of a creative/licensing fee within their budget. Based on the photographer’s experience working with this agency for some of their other clients, and on my experience on similar projects with other brands, we landed on $24,500, which ultimately broke down to $3,500/hotel.

Travel/Scout Days: The first four shoots would be at hotels within the US, and we anticipated one travel/scout day prior to each shoot. We then anticipated a full travel day and a full scout day prior to each of the international locations (which helped to account for limited flights, travel delays and more extensive travel time), followed by one travel day back home.

Pre-Production Day(s): In addition to lining up all of the travel plans, the photographer would also need to communicate with each of the hotel chains and essentially plan seven different small productions, and this covered all of the time involved to handle that workload.

Assistant Days(s): The photographer would bring their assistant with them, rather than hiring locally, and this included 7 shoot days and 11 travel/scout days. While it would have been cheaper to hire local assistants and not include the expense for their travel, sourcing crew (especially internationally) would unnecessarily add to the photographer’s workload. Additionally, working and traveling with a single assistant who understood the project just as well as the photographer would help to streamline communications and execution.

Airfare: This covered one-way flights to/from each location, and I used Kayak.com to help research pricing. When estimating projects like this, I typically add 15% to the cost of a ticket to account for price fluctuation, and also add around $100 in baggage fees per person to account for equipment and oversized/overweight items.

Lodging and Meals: The agency specifically asked us to mark this as TBD and not include this in the bottom line of our estimate. We were comfortable doing so for the lodging since we assumed the hotels could provide accommodations, and while we anticipated that meals could be covered within the hotel property, we still included additional funds for supplemental meals while in transit in the per diem line items below.

Equipment: The photographer owned all the gear they would need to bring, and we based the charge on $1,000/day, factoring in a discount of 3 days equaling a weekly rental, times two weeks.

Car Rental and Local Transportation: I included $350 for each of the domestic trips and $450 for each of the international trips to account for car rentals, taxis, and other modes of transportation needed for each shoot.

Per Diems, Parking, Carnets, Misc.: I included $50/day/person as a per diem, and anticipated at least another $1,000 would need to be spent on other miscellaneous expenses that would arise during the productions and while traveling.

Shoot Processing for Client Review: I included $250 per shoot for the photographer to do an initial pass on the images, and provide the agency with a gallery of images to consider.

Post Processing Day(s): I initially anticipated that we’d charge at least $100 per image, but it felt a little light, and I knew that it would take the photographer the better part of a week to handle the post for this shoot, so I included 6 post processing days, rather than basing it on a per image rate.

Results: We were asked to provide the client with the cost difference between this estimate and one where each of the domestic shoots would be independent trips, followed by a trip to capture the international locations consecutively. We determined it would add roughly $6,000 worth of travel expenses and additional travel days for the photographer and their assistant. The client opted to go with our initial proposal, and the photographer was awarded the project. As for lodging and meals, the client did end up providing accommodations and meals on-site.

If you have any questions, or if you need help estimating or producing a project, please give us a call at 610.260.0200 or reach out. We’re available to help with any and all pricing and negotiating needs—from small stock sales to large ad campaigns.

Pricing & Negotiating: Testimonial Video for Camera Company

Craig Oppenheimer, Wonderful Machine

Concept: Video interview of a photographer and a retoucher

Licensing: Web Collateral use in perpetuity

Photographer: Portrait and fashion specialist

Client: Photographic equipment and software company

Here is the estimate:

image of the photographic estimate for a video interview of a photographer and retoucher

Director/Talent Fee: In addition to a successful career in commercial photography, the photographer was well known in the education community, and was a brand ambassador for a handful of equipment manufacturers. One of the companies he frequently collaborated with was designing a website for a new product and wanted to feature a video of the photographer and his retoucher talking about the product on the landing page. The photographer would direct the video, and would also be the on-camera talent along with his retoucher. The fee needed to take into account the photographer’s directorial input, along with a fee for them to use his likeness, as well as a usage fee. I started at $3,000 for a director fee and added $2,000 to account for both the licensing and the usage of his likeness. I had wanted to add a bit more to the licensing/talent fee, however, based on other similar projects the photographer had worked on, and his relationship with this brand, I felt that $5,000 would likely be the maximum fee palatable for this client.

Retoucher Talent Fee, Travel Days and Travel Expenses: In addition to a talent fee of $1,000 (which the photographer knew would be acceptable to his retoucher, and not far off from what we’d expect to pay as a “real people” talent rate), we included two travel days since the retoucher was based in a different city and would need to travel in for the project. Airfare, lodging, and car rental expenses were based on research, and I included $75/day for meals while traveling.

Studio Rental: The photographer owned his own studio, and we charged a modest rate for its use.

DP/Videographer: While the photographer was certainly capable of shooting this kind of project, he’d be the on-camera talent, and couldn’t do both at the same time. We included this fee to bring on another person to film the testimonial. This person, along with the help of his assistant would also help capture audio.

Grip/Assistant: We included an assistant to lend a hand on set with equipment, audio, and other miscellaneous tasks.

Equipment: The photographer owned all the gear needed for the project, and we charged appropriately for its use.

Meals, Production Supplies, Misc.: I include $50/person for meals, plus $100 for misc. unforeseen expenses that might arise.

Video Editing: We knew that the client wanted two separate videos, each twenty seconds in length. Other than length, the exact parameters were vague at the time of estimating so we erred on the side of caution and included $2,000 to cover 2 days of the photographer’s and retoucher’s time to collaborate on the edit together.

Results: The photographer was awarded the project.

Hindsight: Given how quickly the project was awarded, I do wonder if we could have aimed a bit higher on either the fees or overall bottom line.

If you have any questions, or if you need help estimating or producing a project, please give us a call at 610.260.0200 or reach out. We’re available to help with any and all pricing and negotiating needs—from small stock sales to large ad campaigns.

Pricing & Negotiating: Food, Product, and Lifestyle Library Shoot for a New Cookware Product Launch

Jess Dudley, Wonderful Machine

Concept: Food, product, and lifestyle library shoot for a new cookware product launch

Licensing: Unlimited use of 80 images in perpetuity, Owned-Social Media use of an additional 100 images in perpetuity

Photographer: Food and lifestyle specialist

Client: A Large Multi-National Brand

Here is the estimate:

Screenshot of a redacted real-world photographic estimate

Creative/Licensing: The creative called for a narrative approach to a series of casual family/friend gatherings, revolving around a meal and meal prep, at 3-4 residential locations. The photographer would be tasked with capturing the lifecycle of the meal, from ingredient details to recipe process shots, to product details, to kitchen lifestyle, to plated dishes, to lively dining experiences, and everything in between. Basically documenting a fun dinner party, four times over to cover a variety of recipes, locations, and demographics.
This was a somewhat unique ask from a licensing standpoint. The client wanted a reasonable number of “hero” or “library” images, 20 per day, to include in their brand library and about 25 outtakes per day (really subtle variations of the “heroes”) for owned social media use only. 45 images/day may (or may not) seem crazy, but we were sure to set appropriate expectations and explain that 25 of those, if not more, would fall squarely in the realm of “subtle variation.” With the client duly informed and in alignment, and based on how the photographer stages and shoots, and the narrative nature of the shot list/creative, she was confident she could deliver the 20 “heroes” and requisite outtakes.

This was a rare instance when a client not only provided a budget, but provided a reasonable budget. Though they were asking for “library” or unlimited use, the lion’s share of the images would be used in sales materials and brochures for the product. The occasional shot might find its way into an ad, but for the most part, the usage would be below the line. Normally, we might start a library day rate, including usage, around $7,500-$10,000, and push up (or down) from there based on the specifics. In this case, there was a limit on the number of images (which is not always the case for “library” shoots), a somewhat limited intended use, four consecutive days of shooting, and a fixed budget. As the industry continues to shift and evolve, we see these pressures/forces often and, unfortunately, have been conditioned to presume that the rates must be “discounted” accordingly. This wasn’t exactly a unicorn of a project, but it was close. The scale of the brand, volume of work, and scope of use called for a healthier rate, which we set at $65,000 (a shade off $16k/day). Fortune, and a realistic client smiled on us and the budget could bear the fees.

Photographer Pre-Production and Tech/Scout Days: We don’t often include straight pre-production days for photographers, but in this case, they were needed. We were working with an amazing, collaborative client without an agency. Even though the client knew what they wanted, and were pretty well buttoned up, during the initial conversations, it became clear that there would be a fair amount of conceptualization and oversight required of the photographer. Accordingly, we included four days of pre-production time to cover her considerable involvement in the lead-up to the shoot. We also included one tech/scout day for the location walk-throughs the day before the shoot.

Producer Days, Production Coordinator and PA Days: This was a substantial production: eight talent per day, three locations, product inventory, a total daily headcount around 30 clients, talent, and crew. Sort of an all hands on deck situation. We included a producer and production coordinator to oversee all the moving pieces for the fairly straightforward but relatively large production. Though they worked as a team, the producer ran the show, directing the coordinator through pre-production and clearly delineating roles during the shoot. We also included a PA to help out on the tech/scout day, shoot days and a wrap day.

Photo Crew: With the creative relying on a fair amount on available light, we went with the photographer’s preferred first assistant, second assistant, and digital tech, with the PA as a swing assistant as needed. The first and second assistant both had an extra day included so that the could help out with gear prep and wrap. The tech and her workstation would only be covered for the four shoot days, but the photographer asked that she attend the tech/scout and covered her day rate out of pocket.

Equipment: Though we were reliant on available light to a degree, with such a large production hinging on somewhat uncontrollable environmental factors, we needed to make sure we could replicate daylight, and light the entire scene if need be. This meant a healthy amount of lighting and grip equipment. We also factored in a medium format camera system and a few production supplies like pop-tents, tables, and chairs. Like most rental houses, our local shop offered “three days, same as a week” rates, meaning that we only paid for three days of rentals despite having the gear for six days.

Post: We quoted the post a little differently than I typically would. The photographer’s first assistant was actually on staff and managed most of the photographer’s post-production work. This gave her a fair amount of flexibility in post pricing, and also allowed her to quote/bill for it a little differently. Based on lengthy conversations about post expectations, we determined that, at the most, it would require ten days of her assistant’s time to handle the retouching. However, even though she had that luxury, we also had to prepare for the possibility that, despite a pretty generous post schedule, another project might come up, forcing her to outsource the post. Given the volume, ~80-100 hours, we were confident that many of our retoucher contacts would be glad to take the project on what amounted to about a $100/hr rate.

Location: The client wanted to shoot in four distinct residential settings, three inside the home/kitchen/dining room and one outside on a residential patio or in a backyard. Our local scout quoted us five days of scouting and five days of location management at $750/day plus $3,000/day for each location. We don’t always need a location manager, but with such a large crew we wanted to make sure we had one on set to ensure it was returned as it was found. We also included a location RV, primarily for hair/makeup and wardrobe styling. We’d be able to set up props, catering, etc. under tents in the driveways.

Styling: We were looking for real people to be enjoying their family/friends and food in authentic, luxurious spaces. We budgeted for an excellent team of wardrobe stylists, prop stylists, and food stylists to set the stage and build a believable, authentically layered scene. We also included the cost for the requisite assistants, prep/return time, supplemental props, wardrobe, and food.

Casting and Talent: Our local casting agent provided a quote for a three day live casting event, including prep and the costs for real people lifestyle talent. We would usually expect to pay a bit more for talent, but most of the models would be booked for multiple days, and the nature of the shoot (food being the main focus) meant that we were mostly looking for background talent rather than principals. We also included a talent payroll service to cover talent payments to ensure that we were complying with all of the tax and insurance regulations.

Catering, Insurance, and Misc: We estimated $50 per person per day for breakfast and lunch and $250/day for craft services. We also include insurance to cover the premiums for the gross production costs and a miscellaneous line to cover local transportation, working meals, and any other expenses that were sure to come up.

Results: The photographer was awarded the project and subsequently photographed another market-specific production for the same product line.

Hindsight: The food prep became a little more complicated and messy than we’d hoped. We could have added rented kitchen equipment or a catering truck to manage the food prep off-set. Otherwise, the production went off without a hitch!

If you have any questions, or if you need help estimating or producing a project, please give us a call at 610.260.0200 or reach out. We’re available to help with any pricing and negotiating needs—from small stock sales to large ad campaigns.

Pricing & Negotiating: Marketing Materials for a Real Estate Company

Craig Oppenheimer, Wonderful Machine

Concept: Cityscape images capturing the vibe of a neighborhood as well as portraits of the residents and business owners

Licensing: Unlimited use of 20 images in perpetuity

Photographer: Portrait and landscape specialist

Agency: Design firm in California

Client: Real estate and property management company

Here is the estimate:

image of redacted photographic bid for a case study in pricing and negotiating by Wonderful Machine Executive Producer Craig Oppenheimer

Creative/Licensing: The design firm was establishing the branding for their client’s new real estate development and intended to use a variety of landscape images of the neighborhood and portraits of people within the community in their marketing materials. They anticipated a need for 10 neighborhood shots and 10 environmental portraits and had originally requested b-roll video content to be captured as well. The design firm hoped to capture everything in 1-2 days, and while they would provide the talent without any need for styling, we recommended a 3-day shoot considering the logistics and timing needed to capture everything, and presented a comprehensive estimate.

While the requested licensing was for unlimited use of 20 images in perpetuity, the intended use was limited to their website and various collateral purposes. Considering the limited intended use and my experience estimating projects for similar clients, I based the licensing fee on $500/image, plus $3000 for the video, and separately broke out the photographer’s creative fee for each of the three shoot days. The photographer also planned to scout the area beforehand and handle some basic prep, so we included a fee for a pre-production day as well.

Assistants and Digital Tech: I included a first assistant and a second assistant on each of the three days who would lend a hand with grip/lighting and help keep the pace as the shoot moved from spot to spot within the neighborhood. I also included a digital tech for each of the shoot days, and in addition to a $500 fee for each day, I added another $500 per day for their laptop workstation.

Producer: The producer would be responsible for booking the crew, collaborating to develop a schedule, acquiring permits, and figuring out the best plan for meals, and we felt that 2 days would be sufficient to help line everything up. In an attempt to keep the crew lean and mean on set, we did not include them on the actual shoot days. While they would have been helpful on-site during the shoot, we were asked to keep the team as small as possible, and the photographer felt that he could do without them once the details were all lined up.

Permits: We included $500 to help cover fees charged by the local film office to issue a shooting permit.

Equipment: The photographer primarily relied on natural light along with a minimal lighting system for the portraits, and we included $500/day to cover his own gear. It was a bit on the low end, but we anticipated their budget would be tight, and the photographer was comfortable charging a nominal fee in order to keep the bottom line modest.

DP/Videographer and Video Equipment: We included a DP at $1,500/day to capture the b-roll content, and a similar equipment budget as we anticipate for the photography. The exact parameters for the video were still in the works, but based on the conversations up until this point and their minimal needs, we did not anticipate that an audio tech or any extra sets of hands would be necessary for the video.

Parking, Meals, Misc.: I included $100/day for a light lunch plus $50/day for parking and miscellaneous expenses for each of the three days.

Post Processing: $500 would be dedicated to the photographer’s initial import, edit, and presentation of the images to the client. Once the design firm made their selects, we included $100/image for basic color correction and processing for each of the 20 final images.

Video Editing: Since the scope of their video needs was still developing, the agency wasn’t able to articulate the total run time or style of an edit they might want, so we marked the editing as TBD.

Feedback: In an effort to be more budget conscious, the design firm asked what we might be able to do in order to keep production to two days. We felt that if we were to streamline the schedule and remove the video component of the project we could squeeze the shoot into two days by capturing five portraits per day and shooting as many cityscape images as possible while in transition from one location to another. We submitted a revised estimate that reduced the days for the crew (except the producer prep days) and adjusted appropriately for equipment and expenses. The licensing fees also came down a bit and the DP was removed since the video was stripped away, and all of these changes brought the bottom line down to a place we felt would be more palatable for the client.

Here is the revised estimate:

image of redacted photographic bid for a case study in pricing and negotiating by Wonderful Machine Executive Producer Craig Oppenheimer

Results: The photographer was awarded the project. Since the request for video wasn’t fully fleshed out, the client didn’t seem to mind us removing that element, especially since it allowed the project to be executed within two days, and ultimately help reduce the bottom line.

If you have any questions, or if you need help estimating or producing a project, please give us a call at 610.260.0200 or reach out. We’re available to help with any and all pricing and negotiating needs—from small stock sales to large ad campaigns.

Pricing & Negotiating: Comparing Two Bids with Identical Concepts

Jess Dudley, Wonderful Machine

Concept: Employee profile in multiple workplace situations

Client A: Fortune 500 professional services and consulting company

Client B: Fortune 500 insurance company

Here are the estimates:

screenshot of a pricing estimate for a professional services and consulting company

Estimate for Client A 

screenshot of a pricing estimate for a large insurance company

Estimate for Client B 

I thought it might be interesting to present two bids for very similar projects, in similar markets, shot by comparably experienced photographers, for two different Fortune 500 companies with wildly different bottom lines.

One client (A) was a professional services and consulting company, the other (B) was a large insurance company. Both concepts were nearly identical – profile an employee, shoot in a few different situations in/around the workplace in an “editorial style,” with a change or two of wardrobe ranging from street clothes to active-wear to business attire. The resulting imagery would effectively be the same from both shoots.

There was a subtle but significant disparity in the usage; Client B required more limited use (just Web Collateral) of an unspecified number of images for one year. Client A required a slightly broader use (Collateral and Publicity) of an unspecified number of images for a much longer duration (forever). Despite not being willing to limit the usage to a specific number of images, they both expressed reasonable expectations, 3-5 finished images. Generally, we prefer limiting the usage to a set number of images, but considering the nature of the concepts and usage, it was pretty clear that whatever value they might be able to squeeze out, the entire shoot would be limited by the fact that we were shooting just one subject in 2-3 different scenarios. The variations would be subtle and likely wouldn’t generate a significant amount of value relative to the hero images. As such, we were comfortable foregoing the limitation on the number of images in both cases.

The other divergence was in the production expectations, which varied quite a bit. Client A expected a low-impact, editorial-style approach, while Client B expected a more comprehensive approach with a fair amount of production support, replete with a tech/scout day, stylist, digital tech, supplemental wardrobe, and catering.

What’s most interesting and noteworthy is the difference in the overall budget allocated, and specifically the photography fees. Bear in mind these are two companies that operate on the same scale. We were only able to muscle out a $1,800 creative fee from Client A, including the more extensive usage. Our first bid was more than double the bottom line shown here and we were ultimately presented with a take it or leave it budget. On the other hand, Client B accepted a $5,500 creative fee for more limited usage.

There are countless justifications for the discrepancy. Organizational structure, intended use (passive profile page vs. an internal campaign), the importance of the subject, fiscal timing (one may have had money to burn, who knows), audience (consumer, trade, internal, external, etc.) all factor into the value a client attributes to any given project.

Licensing value is subjective, driven more-so by the client’s expectations than anything else. Until we determine otherwise, we approach each potential project and bid with the assumption that the client has high expectations for quality and a budget to match. From there, we sometimes whittle down as needed to land the gig, while avoiding the pitfalls of underbidding (leaving money on the table, doing more production work than agreed to, etc.).

If you have any questions, or if you need help estimating or producing a project, please give us a call at 610.260.0200 or reach out by email. We’re available to help with any and all pricing and negotiating needs—from small stock sales to large ad campaigns.

Expert Advice: Printing with Lightroom

Molly Glynn, Wonderful Machine

Printing is a process of problem-solving and iteration, from loading the paper into the printer to ensuring the final product is color corrected. I like to say that printing is mostly just putting out fires– as soon as you solve one issue, another is bound to arise.

Not every photographer finds owning and running their own printer worth the cost. It can be a time-consuming process, and ink and paper don’t come cheap. But, it can also be intensely satisfying to create an image from an initial concept to the final print.

I’ll preface by saying that there are many opinions when it comes to printing and equally as many methods for printing as there are printers in the world. Everyone has their preferences, and this guide is made to be a baseline on which you can develop your skills and form your own style of printing.

Step One: Choose Your Printer

We have two Epson Surecolor P800 printers, which are large format printers designed for a variety of paper types. We’ve found them perfect for our Print Portfolio Production, as well as for some larger, poster-sized prints.

Black Epson Surecolor P800 printer at Wonderful Machine

The P800 accepts paper up to 17 inches wide, which makes it a perfect size for making test prints or small exhibition prints. If you are looking to make even larger prints, take a peek at the P7000 or its older friend the Stylus Pro 7880.

It seems that with larger print size comes an increase in printer trouble – from file buffering to color banding. Ultimately, my advice is to leave especially large or important prints to professional printing houses who have the tools, expertise, and time to create a perfect print for you.

Step Two: Choose Your Paper

We use Moab Lasal Matte paper, which is double-sided and can be ordered pre-punched and pre-scored for standard-size screw post binders. Heavyweight matte paper is great for most photo uses, but specific clients may want a pearl, luster, or full gloss finish instead. We generally discourage photographers from using glossy paper for portfolios due to its tendency to glare, gather fingerprints, and collect dust.

Whatever paper you choose, make sure you purchase a size and type that is compatible with your printer. Most finished papers are single-sided, so if you want front and back images in your portfolio, that’s an important factor to consider. Other important factors include the weight of your paper and the ink recommendations, as well as the reputation of the color profiles associated with the paper. For instance, I’ve found Moab profiles generally easy to use but Hahnemühle profiles difficult to print.

Step Three: Choose Your Program

Here is where the opinions really start coming in. Depending on your experience with printing, you’ll find yourself drawn to one program over another. There are a few different reputable programs to print, including nearly all of the Adobe Creative Suite. Most photographers are proficient in Photoshop and/or Lightroom, and either is a great choice for printing. Some printing houses and even advanced home printers will use special drivers or RIP software to ensure perfect results between multiple printers.

Photoshop does offer more print customization and flexibility in layout, but we’ve found that Lightroom is better for producing multiple prints in succession due largely to its library and preset functionality.

Lightroom is the most user-friendly printing option but still maintains the level of control necessary for making high-quality prints. As such, this guide is written for Lightroom with the novice printer in mind.

Wonderful Machine photo editor Molly Glynn using Adobe Lightroom

Step Four: Choosing Templates and Settings

Lightroom’s print module comes with pre-designed templates for a variety of printing options (all designed for 8.5×11 paper). These work well as an introduction to what you can do to lay out an image– whether you’re looking to print a contact sheet, some 5×7 images, or one basic test print.

What’s even nicer about Lightroom’s printing templates is the ability to customize them. On the right-hand side of the print module, you’ll notice there are six sections with options to make adjustments to your final print: Layout Style, Image Settings, Layout, Guides, Page, and Print Job.

LAYOUT STYLE

Adobe Lightroom screenshot of Print Layout Style

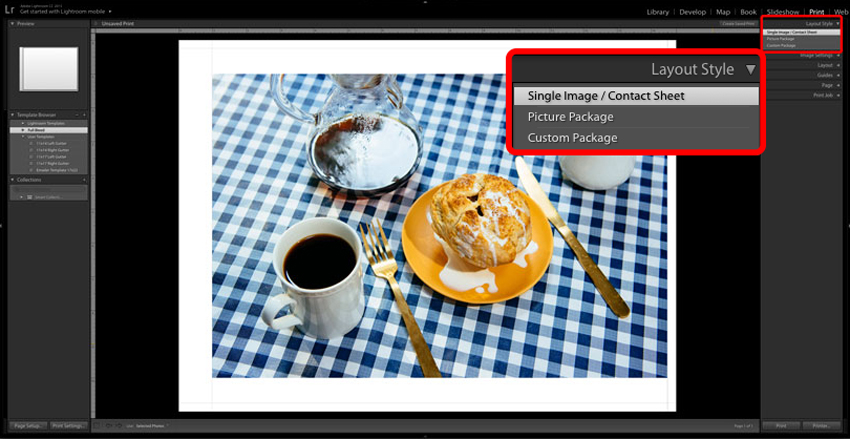
Most often, you’ll stick to “Single Image/Contact Sheet,” unless printing a retail picture package. Either way, just use the cells menu to add images in your preferred size and build out as you please!

IMAGE SETTINGS

Adobe Lightroom screenshot of Print Image Settings

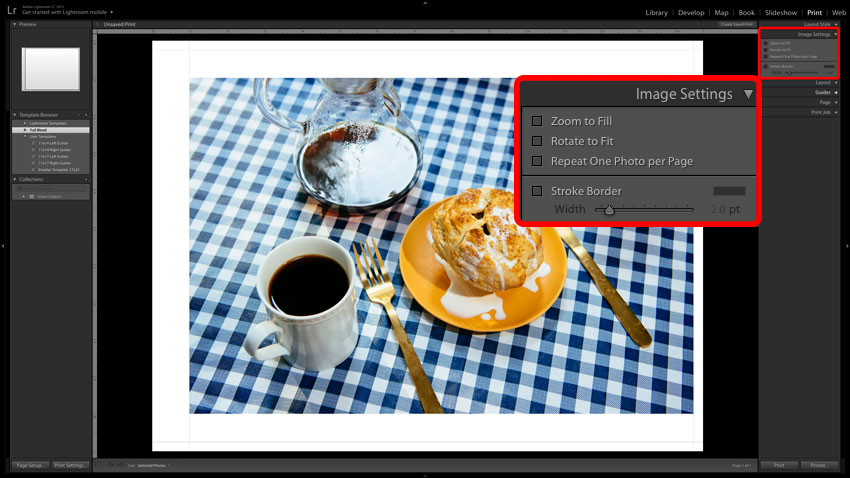
Your images won’t always fit into a template exactly the way you want them, and that’s where image settings come in. The checkboxes give you options to Zoom to Fill, Rotate to Fit, or Repeat One Photo per Page. This is mostly self-explanatory, but it’s good to note that selecting Zoom to Fill will crop your image. You can adjust the crop by clicking and dragging your mouse over the image.

There’s also an option to add a stroke border around your image. I generally don’t recommend adding any sort of border to an image– most of the time, it only makes an image look dated.

LAYOUT

Adobe Lightroom screenshot of Print Layout

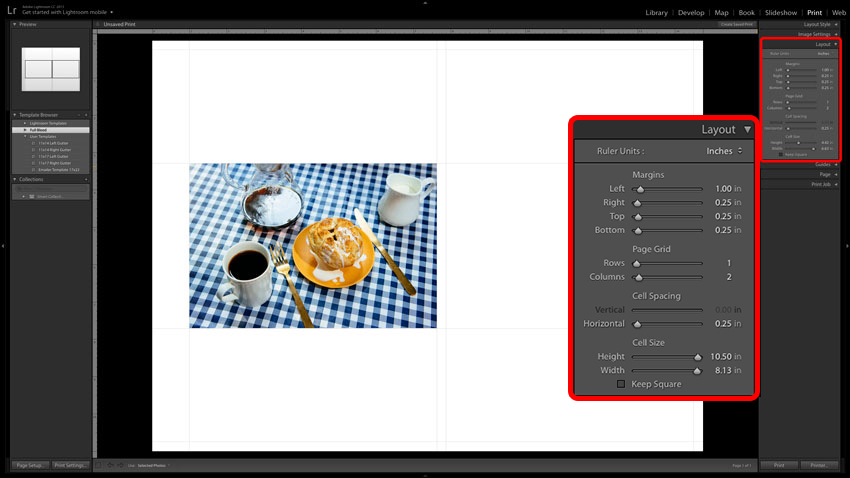
Perhaps one of the most important menus to use when creating custom templates or adjusting pre-existing ones, the Layout menu allows you to adjust the Margins, Page Grid, Cell Spacing, and Cell Size of a print.

Setting Margins allows you to work within what you know or wish to be printable space. For example, when I am setting up a portfolio print for a screw post book, I know that I need to allow for at least one inch on the inside edge of the page for the punched holes. If I want a vertical image to sit all the way to the left side of the page, I’ll adjust the right margin to push it towards the left edge.

The Page Grid sets how many image cells (in rows and columns) are on a single page. If I want a top and bottom image, I’ll set the rows to two. If I want a triptych, I’ll up the columns to set three images side-by-side. Whenever you have more than one image cell on a page, the Cell Spacing field will come into play. Increasing the horizontal or vertical spacing will add white space between your cells so the images no longer touch.

The Cell Size adjusts the space allotted for each image on the page. When the sliders are all the way to the right, a cell is as large as it can possibly be on the page. This is inversely related to cell spacing, so be careful when adjusting. I usually find it most useful to first set my cell size, then my spacing.

GUIDES

Adobe Lightroom screenshot of Print Guides

Guides don’t affect the final print. They are just as they advertise– guides that help you understand how your print is laid out on the page. Just as in Photoshop, the Rulers give you, in inches, a way to see the scale of your print. If you have custom settings in page setup (such as the printable area on your chosen paper), then checking Page Bleed will gray out any areas that cannot be safely printed.

Margins and Gutters show up as light gray lines that intersect all the cross sections of your page (your outer margins, image cells, etc). The Image Cells Guide looks like a stroke border around the border of the image cell. It’s usually a good idea to keep an eye on how much space is available for an image and is especially useful if your image has a white background that blends in with the print preview. Finally, Dimensions shows just that– the numerical dimension of each image.

PAGE

Adobe Lightroom screenshot of Print Page settings

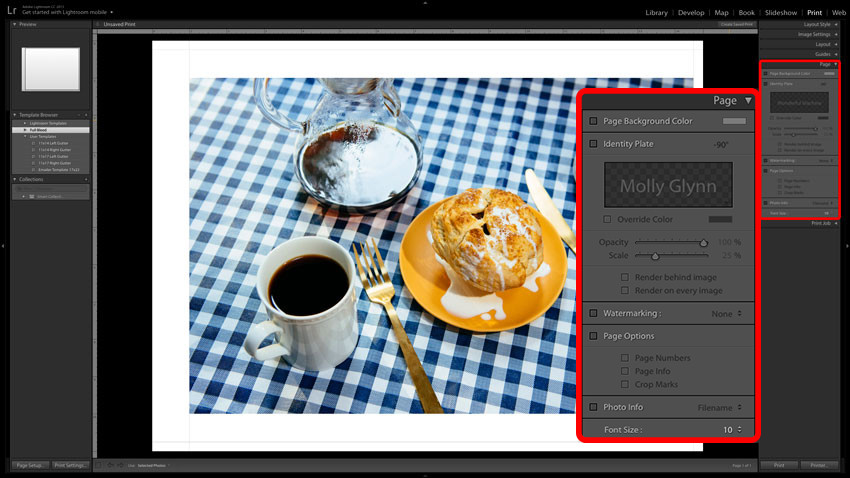
If you are printing proofs, a series of pages, or contact sheets, you might find Page settings useful. Here, you can set a background color, add an Identity Plate (a rudimentary watermark) upload or create your own watermark, include print settings, add page numbers or crop marks, or include file information under each image. Each adjustment has its uses, and I’ll leave it to you to imagine the possibilities.

PRINT JOB

Adobe Lightroom screenshot of Print Job settings

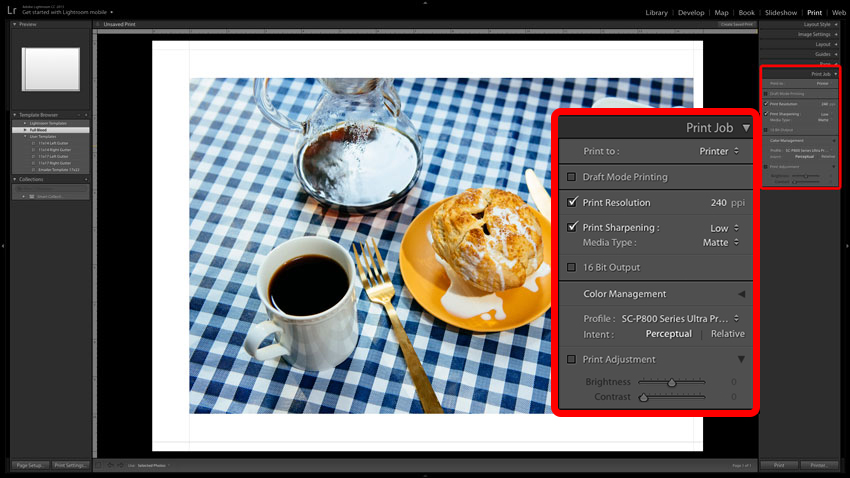
Maybe you were nodding off, but here’s the time to pay attention. The Print Job settings can radically adjust the way your image is rendered by your printer, so it’s important to make sure you choose the correct settings for your intended use.

The Epson printers we use have a native print resolution of 240ppi (pixels per inch), so that is our ideal Lightroom Input Resolution. We have found that a minimal amount of sharpening looks best, so we keep Print Sharpening set to Low. If you’re using a pearl or luster paper, your Media Type may be Glossy, but with paper like the Moab Lasal we use, make sure Media Type is set to Matte. If your printer accepts 16-bit Output, select that box, but if your printer doesn’t or you don’t know, it is best to leave it unchecked. Printers not designed for 16-bit Output will print the image much slower without any improvement in quality.

Color Management can have a profound effect on your prints, and you almost never want to leave the Managed by Printer setting on. Instead, look up the proper ICC profile for your paper and make sure it is installed, or check out the list of paper profiles provided by your printer manufacturer. I leave the Intent set to Perceptual, leave Print Adjustment off, and save my entire template.

Once you’ve adjusted your settings just how you like them, you can save those adjustments as a User Template. Lightroom will save these templates and you’ll be able to easily pick up where you left off with a contact sheet, test print, or portfolio image with the click of a button whenever you reopen Lightroom (even between catalogs).

Step Five: Using the Printer

Each printer has different features and accepts different paper in different ways. If possible, I recommend using a front or rear flat loading option for heavyweight paper to avoid the possibility of bending or jamming the paper. See your printer manufacturer’s instructions for more info on loading paper.

Some printers give you the option to print wirelessly, but I recommend printing through a USB because it’s faster and easier to troubleshoot.

When sending an image to the printer from Lightroom (or any other program), you never just press Print. You’ll always have the option of Printer…, which will lead you to the print dialogue and give you the option to adjust your print settings.

Adobe Lightroom screenshot of Print Settings


Final Adobe Lightroom print dialogue
 

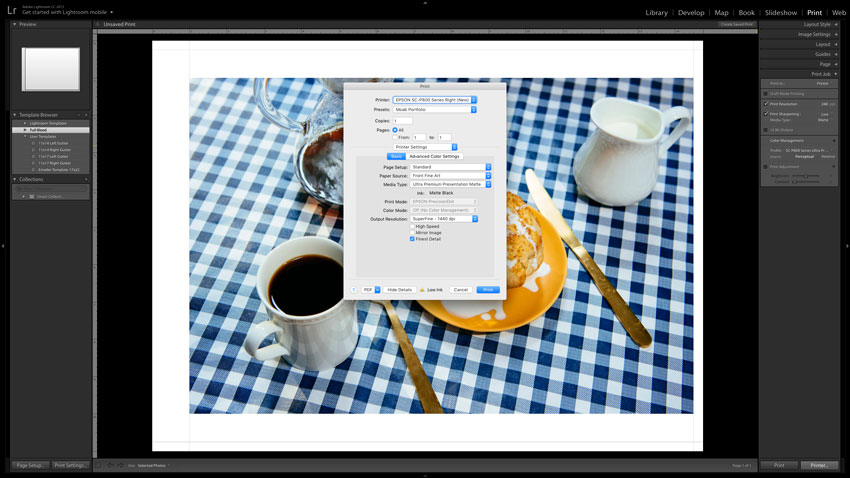
If your computer is connected to multiple printers, first ensure you’re selecting settings for the right printer. There’s no frustration quite like getting all your settings straight only to have to swap printers and do it all over again.

Unless you’re using roll paper, your page setup should be set to Standard. This will also bring up the Paper Source menu, where you can find whichever flat loading option you’ve used with your printer.

Your Media Type should match your paper as closely as possible. For the most part, you’ll either use the photo paper or matte paper options, and you can check with your paper manufacturer to see which media type is the best fit. For Moab Lasal Matte, the setting is Ultra Premium Presentation Matte paper.

If you properly selected an ICC color profile in Lightroom and unchecked Managed by Printer, the Print Mode and Color Mode options should be greyed out. If they aren’t, chances are you neglected to save your settings.

We set the Output Resolution to SuperFine 1440 dpi (dots per inch). Anything less will adversely affect your print quality, and SuperPhoto’s 2880 dpi is a level of detail beyond what most printers can accurately produce. Leave High Speed and Mirror Image unchecked, and select Finest Detail for a slightly slower but more intricate print.

You can also create presets in the print dialogue so that these settings are the default, and you’ll only need to check that nothing has changed before sending the image off to the printer.

Step Six: Viewing your Prints

Remember the old adage “don’t judge a book by its cover?” Likewise, don’t judge a print before it’s dry. Depending on the type of paper you use, a print can take between 10 minutes and a few hours to completely dry. Darker colors take longer to dry and can come out of the printer looking almost totally black, then show more detail as the ink fully dries.

Since I am normally printing on both sides of a page, I give a large leeway for pages to dry, usually overnight, before I run them through the printer again. This helps prevent nicks and scratches on the first side and keeps the interior of the printer as clean as possible for the second side.

Printing on matte paper leaves you with beautiful final prints, but it’s also more susceptible to marks. If you have a print that has deep blacks or generally darker colors, you’ll want to take a flashlight to it to detect any scuff marks.

Finally, you will also want to view the prints in multiple lighting scenarios. We all know that daylight affects colors differently than fluorescent or incandescent light, and since a printed portfolio will end up in all sorts of lighting situations, you want to check that you’re comfortable with the overall color and contrast of your book.

Printing is no easy task. It’s sort of like learning to drive– you might be able to get from one place to another, but it takes time to really feel comfortable with the process.

Be patient with your mistakes, and keep track of the problems you’ve solved before, lest they come up again. And, like driving, always check and double check before you put your foot on the gas.

Wonderful Machine photo editor Molly Glynn loads paper into Epson P800 printer

Have any questions or opinions about printing you’d like to share? Feel free to reach out!

Pricing & Negotiating: Still Life Images for a Home Goods Brand

Julia Hanley, Wonderful Machine

Concept: Still life images of a consumer product

Location: A studio in a major market

Licensing: Out-of-Home, Print Advertising, and Web Advertising use of up to five hero images and ten insert images in perpetuity

Photographer: Still life specialist

Client: A large US-based home goods brand

Here is the estimate:

PDF of pricing and negotiating estimate for a US American home goods brand

Creative/Licensing: The agency came to us with five distinct conceptual ads, each of which featured one hero image portraying a single product in use, accompanied by two to three smaller images (referred to as “insert images” by the agency) showcasing specific features of each product. Additionally, each ad incorporated conceptual text/copy that would need to be created in post via CGI.

Each conceptual still life scene was unique and involved a complicated set in terms of the design and prop elements. For each set, we had to incorporate both 3D layout copy and create an effect where the set began to blend into the studio background. In order to execute the desired effects, we would need a top-tier prop styling team in addition to supplementing with CGI in post. The use of CGI would enhance the three-dimensional text and the textured background elements.

The agency requested out-of-home, print advertising, and web advertising use of the final ads in perpetuity. I considered factors that increased the overall value of the images, such as the brand’s name recognition, the photographer’s expertise and creative input, the usage requirements and uniqueness of each ad, etc. Based on previous experiences and similar projects, we determined the appropriate creative/licensing fee to be $41,000, which broke down to $8,200 for each final ad.

Pre-Light Day(s): Due to the technical lighting needed for the various sets, we included one pre-light day at the studio space for the photographer and incorporated this day throughout the estimate for the crew.

Producer Day(s): I estimated four prep days, one pre-light day, three shoot days, and one wrap day for the producer. We expected a large amount of pre-production in a short window to hire a crew, book a studio, rent equipment, manage talent, etc. The producer would also help manage the CGI post-production components.

Assistants and Digital Tech: I included two assistants for the shoot days and pre-light day and a digital tech for an equal amount of days. The digital tech’s fee also included the cost of their workstation and kit.

Studio Rental and Equipment: We’d need ample space to work within, which didn’t come cheap in this market. A studio in this major market can range from $1,500-$3,000/day. We included $3,000/day for a studio to account for one pre-light day and three shoot days, and an additional $2,000/day for grip and lighting equipment.

Prop Stylist, Assistant, and Props: Each hero image involved sophisticated prop styling as well as minor set design skills. Although the sets consisted of simple materials, it would require a seasoned professional to pull off such sophisticated styling, so I wanted to be sure the stylist had the assistance and prep time needed to source the necessary items. Being a New York-based prop stylist, it is not unusual that the price is higher as stylists cost more in bigger markets, on top of a typical agency fee. I estimated two prep days, one pre-light day, three shoot days, and one day of returns for the prop stylist, and included an assistant for one of those prep days, each shoot day and one day of returns.

Wardrobe Stylist and Wardrobe: The wardrobe stylist’s fee and wardrobe expense covered one day of prep, one day on set, and one day of returns. The wardrobe specs were very straightforward, with minor shopping needed, and covered one unrecognizable talent for a half-day.

Casting and Talent Day(s): We had to cast one adult male, from cards, for a half-day on set as unrecognizable talent. Because of this, we negotiated a modest fee for the talent, inclusive of unlimited use.

Post Production (Retouching Hours, CGI Rendering, CGI Contingency, File Transfer, Hard Drives): We received three different quotes (and treatments) from CGI artists. The CGI rendering fee was based on one of the quotes we received, determined by the number of shots, the complexity of the scenes, and the deadline for images (which was a tight turnaround). Because of these factors, we incorporated a rush fee and a contingency fee, in case we exceeded the estimated number of retouching hours or needed to pull in additional resources to meet the agency’s deadline.

Catering/Craft: Catering/Craft covered three days on set with as many as 10-12 people on set per day.

Insurance: This covered a policy that would meet the requirements of the agency, based on an industry standard rate of approximately 2% of the production expenses.

Parking/Shipping/Tolls/Misc.: Finally, we included a miscellaneous fee to cover some costs that may be incurred during the pre-light day and any last-minute production costs that could arise.

Feedback: Although the art buyer assured us that our numbers were competitive, it came down to creative preference and they decided to move forward with a different photographer.

If you have any questions, or if you need help estimating or producing a project, please give us a call at 610.260.0200 or reach out by email. We’re available to help with any and all pricing and negotiating needs—from small stock sales to large ad campaigns.

Expert Advice: One-On-One Portfolio Reviews

Erika Blatt, Wonderful Machine

One-on-one portfolio reviews should be an essential part of any photographer’s marketing plan. It’s an excellent opportunity to get your work literally under the noses of decision makers at ad agencies, publications, and brands. We’ve found that creatives are more likely to work with photographers they know, and meetings are a great way to solidify those relationships. It’s your opportunity to present your brand, your work, and yourself. However, many photographers find the idea of setting up meetings to be somewhat daunting, so I’ve put together a step-by-step guide to securing and preparing for your portfolio reviews.

erika blatt, expert advice, wonderful machine, one-on-one portfolio events

PREPARING YOUR PROMOTIONAL MATERIALS

Before even setting up a meeting, your promotional materials need to be in order and ready to go.

  • First things first, make sure your website is up-to-date and fully functional. Nobody is going to make an appointment with you without first checking out your site. Make sure it’s solid (see our Expert Advice: Website Dos and Don’ts).
  • Make sure your book is up-to-date and well-edited. Get a second opinion on your edit from a friend or a consultant (see our Expert Advice: How to Edit Photographs).
  • Consider whether an iPad portfolio is appropriate for you. Print portfolios still get more attention from clients at our portfolio events than iPads do. But tablets are essential if you shoot motion, and they’re also a nice supplement to show recent projects or to go into greater depths on a particular subject.
  • Have an appropriate leave-behind ready to go. A simple postcard can work. However, you’ll score extra points for something unique like a small booklet or even an app (like Tony Burns’ Shooting The World). Whenever possible, your leave-behind should be memorable, inventive, and reflective of your brand.

RESEARCH YOUR PROSPECTS

Whether you’re traveling across the country, or just across town, take the time to do some research and make sure you’re barking up the right trees. Check out each client’s website to make sure that your photography matches up with their needs, so you don’t waste your time or theirs. Start close to home and then branch out from there. You will only be able to meet with a relatively small number of prospects over the course of your career, so make each appointment count.

As useful as list services are, nothing is more valuable than personal networking. When you find one client who responds to your work, ask them if they know any others who might be a good match for you. As you start to cultivate relationships with prospective clients, it will be essential to keep good records of your interactions with them.

REQUESTING & PLANNING FOR MEETINGS

After you’ve compiled your list of prospects that you want to meet with, the next step is to start reaching out. We’ve found that contacting people roughly a week before you’d like to meet is a good rule of thumb. Do it too far in advance, and you risk having them forget about the meeting or canceling on you. Too little notice may find them already booked up. Start with a casual email that includes the following:

  • The prospect’s name
  • A little about how your skills and interests might match up with their needs
  • A link to your site
  • The dates and times you’re available

There are a few tricks you can use that can help you get noticed:

  • Don’t attach images to your email. I find that this increases the chance of your email getting stuck in spam filters. But it doesn’t hurt to attach a JPEG to your follow-up email.
  • Give the impression that you’re going to be in town for other meetings (even if you haven’t set up any others yet). You don’t want anyone to feel the pressure that you’re making a special trip for them.
  • Don’t ask for too much time. “A few minutes” is what you should ask for. If you get more than that, then great! Here’s a basic template you can follow:

erika blatt, wonderful machine, expert advice, marketing consulting, prospect list services, face to face with clients

A couple of days later, if you haven’t heard back from them, follow up with a phone call. Keep the call short and sweet:

Hi, this is XXX, I’m a type of photographer based in city. I sent you an email a few days ago about meeting with you for a few minutes to hear about your creative needs and if there’s a way my style would fit in.

Sometimes it’s helpful to write out a script and practice it, so you’re comfortable with what you’re going to say. You might have to practice it a few times, so you don’t sound like a robot. Creating a succinct message that you can deliver in a relaxed way will give you the best chance of success. Creating an alternate script for voicemails is a good idea too.

Similar to the email, only ask if they have a few minutes to take a look at your book. If they don’t answer, or don’t get back to you, you can try sending one last email. But don’t get hung up on this one client, just move on to the next. Remember, the more people you reach out to for meetings, the more likely someone will have some interest or time available.

Once you start booking meetings, make sure you give yourself enough time for each meeting plus travel time to get to the next one. If you’re going to New York, try to book as many meetings as possible within walking distance so you can maximize your time. If you have to drive from one meeting to the next, account for the time it takes to get your car out of the parking garage and then find parking at the next place. Give yourself enough time for meetings to run long.

Build an itinerary for yourself including time of meetings, contact’s name, phone number, email address, physical address. Plan ahead how you’ll be getting around. (By the way, TripIt is a great (free) app for keeping track of meetings.)

THE MEETINGS

Now that you’ve booked your meetings, time to do some additional research on the clients. One-on-one portfolio meetings are usually with one or two other people and quite casual, lasting less than 20 minutes. Check out their LinkedIn, Instagram, and social media sites in addition to their website. You’ll want to demonstrate that you know their business and you’ll have enough to talk about. If you’re meeting with an agency because you think you’d be a great fit for their client, make sure they still have that client. See if there are any similarities between the two of you, it’s nice to have those candid moments during the meeting that show your interest and preparation. Plus, the client will feel more at ease. If it’s in the morning, it can be a nice touch to pick up a couple of extra coffees to bring along to the meeting.

Make sure you’re dressed for the occasion. While most ad agencies have casual dress codes and work environments, that doesn’t mean you should show up for a meeting in a hoodie. Dress the part of someone that could command a high-value shoot.

erika blatt, expert advice, wonderful machine, one-on-one portfolio events

Once you’ve arrived at your meeting, it’s time to turn on the charm! Be relaxed, but energetic. I’d start with your elevator pitch and then walk them through your portfolio, explaining your creative process, and then offer up interesting stories or details about your experience on that shoot when you see them lingering on a certain image. You’ll find that some clients are expressive and chatty when looking through your book, while others like to flip through the pages quietly. You’ll have to gauge yourself whether or not they feel like talking while they look at your work.

Don’t ask clients to critique your photography or your presentation. That’s not their job, and it will make you seem like an amateur. Just guide them through your work and express an interest in their projects. Show that you’re interested in what they’re doing, but no hard sell. They may ask you about any personal projects you’re working on … sometimes to see if you are an inspired photographer with your own ideas or sometimes to see if it’s something they’d be interested in seeing.

Don’t expect to get an assignment on the spot and don’t be upset if you feel like you didn’t get the praise you were hoping for! The purpose of these meetings is for creatives/photo editors to get to know you and hopefully build up a comfort level so they will ask you for a bid when an appropriate project comes up.

Be sure to take your print book (obviously!), your print promo or leave-behind, as well as business cards. Again, if you shoot motion, it’s a must to bring an iPad or tablet.

FOLLOW UP

A few days later, send a hand-written thank-you note. Keep it short and sweet, just to thank them for the meeting. If you have any additional promos or branded garb (t-shirts, mugs, notebooks, etc.) now’s a good time to send that as well.

From there, an occasional email or print promo update is appropriate (every few months), especially if you have some news to share. It’s also smart to connect on LinkedIn so you can keep track of their career path. Creative departments are continually evolving and switching accounts, or following accounts to different agencies – you never know when a good prospect moves to a new company that would be perfect for your photography. Plus, it helps you to stay on their radar.

If you need a hand building a client list or setting up meetings, please call us at 610.260.0200 or reach out. Or you can visit our consulting page to learn more.